Are you a seasoned SOLIDWORKS user looking to take your design skills to the next level? If so, you’re in the right place. In this blog, we’re diving deep into one of SOLIDWORKS’ powerful, yet often overlooked features: Design Tables. These versatile tools can significantly streamline your design workflow and help you manage complex configurations with ease.
Understanding the Power of Design Tables
Design Tables in SOLIDWORKS allow you to create multiple configurations of a part or assembly within a single file. This means you can quickly generate variations of your design without duplicating files or creating version confusion. Imagine the time saved by tweaking parameters in a single table rather than editing multiple files, assemblies, or individual parts.
Design Tables excel at managing configurations where multiple dimensions and parameters change together. For instance, if you’re designing a bracket that comes in various sizes, materials, and hole placements, a design table can efficiently handle these variations.
Getting Started: Creating a Design Table
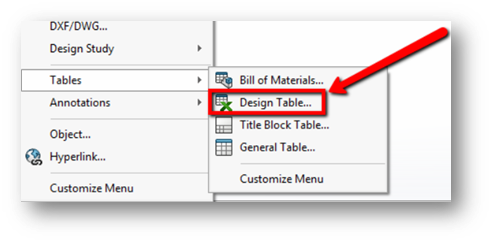
To begin click Insert in your top toolbar, navigate down to Tables at the bottom of the menu, and select Design Table. SOLIDWORKS will guide you through the process of setting up the table.
- Creating from Scratch: If you’re starting from scratch, you’ll define the columns and rows of the table based on the parameters you want to control. Each cell in the table corresponds to a parameter, and each row represents a different configuration.
- Importing from Excel: If you have an existing Excel spreadsheet with the parameters and configurations, you can import it into SOLIDWORKS. This is a great option if you’ve already set up your design variations outside the software.
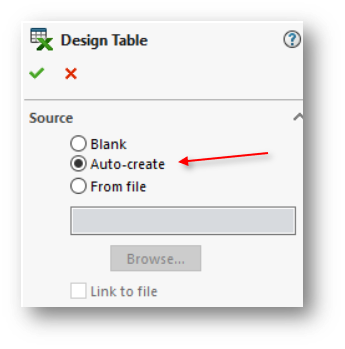
- Automatic Generation: SOLIDWORKS can automatically create a design table for you based on the existing configurations. This can be a time-saver when you’ve already created multiple configurations.
Optimizing Your Workflow with Advanced Tips
- Excel Expertise Pays Off: Design Tables are linked to Excel spreadsheets. A good understanding of Excel functions can help you manipulate your configurations more efficiently. You can use Excel formulas to control dimensions, equations, and more. For example, you can set up equations that derive one dimension from another, ensuring consistency across configurations.
- Creating User-Friendly Tables: Make your design table easy to navigate by using clear headers, color coding, and grouping related parameters. This not only improves your experience but also makes it user-friendly for colleagues who may need to work with your design. Organize parameters logically to enhance the readability of the table.
- Leveraging Global Variables and Equations: Design Tables can manage not only dimensions but also global variables and equations. This means you can create complex relationships between parameters, enabling more sophisticated design variations. Suppose you’re designing a telescopic mechanism. You can use equations to control the length of different components based on a single parameter.
- Using IF Statements for Smart Configurations: IF statements within Excel can be used to control specific configurations based on certain conditions. This is a powerful way to automate design changes based on logical rules. For instance, you can use an IF statement to automatically select a specific material based on the desired load-bearing capacity of a part.
- Linking External Data: Did you know you can link external data sources, like spreadsheets or databases, to your design table? This can be incredibly useful for keeping your design parameters up to date without manual entry. If you’re managing material specifications in an external database, linking it to your design table ensures accuracy and consistency.
- Keep an Eye on Performance: While design tables can be immensely powerful, they can also impact performance in large assemblies. Use configurations wisely and consider suppressing unnecessary components to maintain performance. Additionally, if you’re working on a collaborative project, ensure that everyone understands the structure of the design table to avoid conflicting changes.
Conclusion
Design Tables in SOLIDWORKS are a potent asset for optimizing your design workflow, managing variations, and ensuring accuracy. By mastering the advanced tips mentioned in this blog, you’ll be better equipped to handle complex configurations efficiently and effectively.
Remember, practice makes perfect. Experiment with different scenarios, test your configurations thoroughly and embrace the flexibility and efficiency that SOLIDWORKS’ Design Tables offer. Your designs will thank you, and you’ll find yourself navigating even the most intricate projects with ease!
For more information on how to optimize your use of SOLIDWORKS, or to make sure you’re up to date with all the latest updates, upgrades, and new tools, Xperts suggest dedicated training. Explore our full schedule of available classes and certifications here, or reach out to the Xperts directly for custom training to fit your design routines.


