Exporting Derived Outputs from the 3DEXPERIENCE Platform

BLOG

Exporting Derived Outputs from the 3DEXPERIENCE Platform

On the 3DEXPERIENCE platform, Derived Outputs; such as PDFs, DXFs, STEP files, and other neutral formats are created from your CAD data for downstream use. These files are often shared with customers, suppliers, or partners who don’t have access to your platform tenant.

In this article, we’ll walk through a few practical ways to package and export Derived Outputs so they’re ready to send outside your organization.

Note: Dassault Systèmes provides general documentation on Derived Outputs. If you need help with setup, automation, or best practices, our technical support and implementation teams are always happy to help.

Choosing the Right Method

There are a couple of different apps and workflows you can use, each with its own advantages depending on:

  • The number of files involved

  • Whether you’re working with a single assembly or many

  • How much cleanup you want to do afterward

Let’s take a look at the most common approaches.

Using the Product Explorer App

Method 1: Download Derived Outputs from a Single Assembly

1. Open the assembly in Product Explorer that already has Derived Outputs.

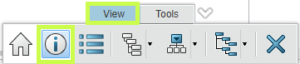
2. Select the top-level assembly node (it will highlight in blue).Exporting derived outputs from the 3DEXPERIENCE platform including PDF, DXF and STEP files3. Click the Information (i) icon in the lower toolbar.

3DEXPERIENCE platform interface showing derived output export options for CAD data

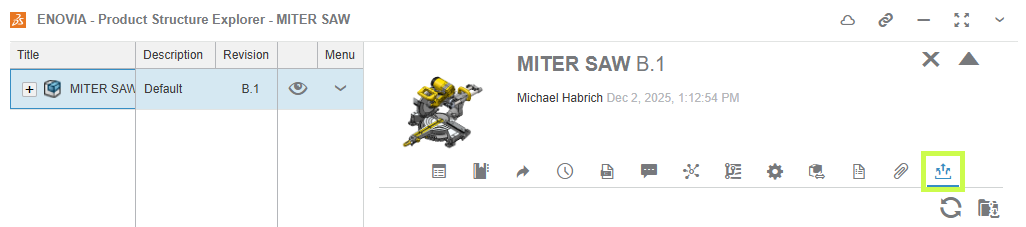
This opens the information side panel.

4. Navigate to Derived Formats.

Engineer exporting neutral CAD file formats from the 3DEXPERIENCE platform

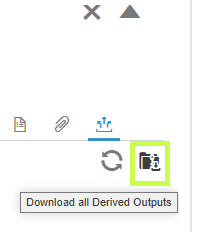
5. Click Download All Derived Outputs.

CAD data conversion and derived output management in the 3DEXPERIENCE platform

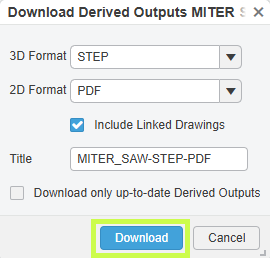
6. Choose which 2D and 3D formats you want to include.

7. Name the ZIP file and click Download.

Workflow for exporting PDFs and manufacturing files from 3DEXPERIENCE

If you’ve added multiple assemblies to Product Explorer, you’ll need to repeat this process for each one.

Trade-off:

  • ✔ Clean output (Derived Outputs only)

  • ✖ One assembly at a time

Method 2: Export Multiple Assemblies at Once

If you need to collect outputs from several assemblies or even unrelated parts this method is much faster.

1. Add assemblies or parts to Product Explorer.

2. Select multiple items using checkboxes or Shift + Select.

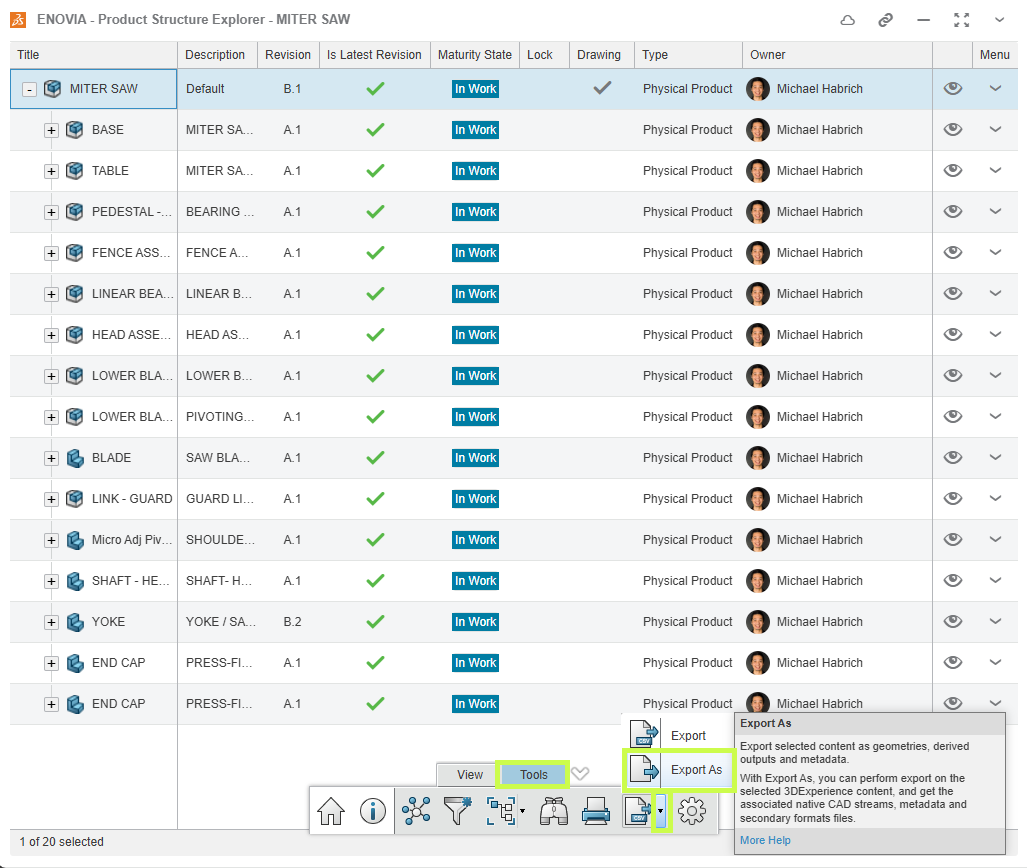
3. Click Export As from the bottom toolbar.

Export process for derived outputs such as STEP and DXF files in 3DEXPERIENCE

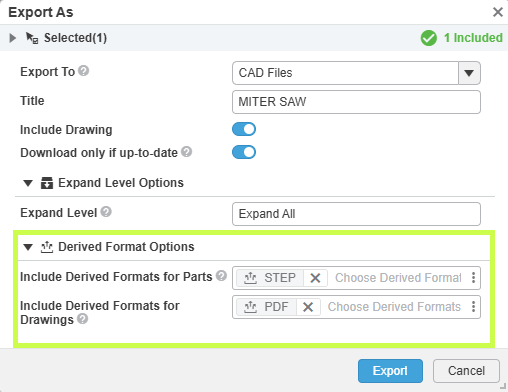
4. Name the export, enable Expand All, and set the Derived Format Options.

5. Click Export.

Sharing derived outputs from the 3DEXPERIENCE platform with suppliers and customers

A background job will start.

Once complete:

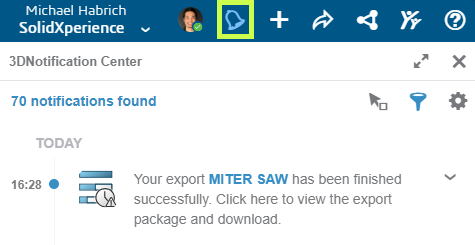
  • A notification appears in the upper-right corner.

Technical illustration of derived output generation from CAD models in 3DEXPERIENCE

  • Click the notification to open the CAD Data Processor Monitoring app.

  • Use the Download button to retrieve the ZIP file.

3DEXPERIENCE export tools for downstream manufacturing and collaboration workflows

This ZIP will include both CAD files and Derived Outputs. To keep only the outputs, simply open the ZIP in Windows Explorer, sort by file type, and remove any files you don’t need.

Trade-off:

  • ✔ Multiple assemblies or mixed files at once

  • ✖ Manual cleanup required

Using the Bookmark Editor App

Method 1: Download Outputs from a Single Assembly

1. Locate the assembly in a bookmark (or add it to one).

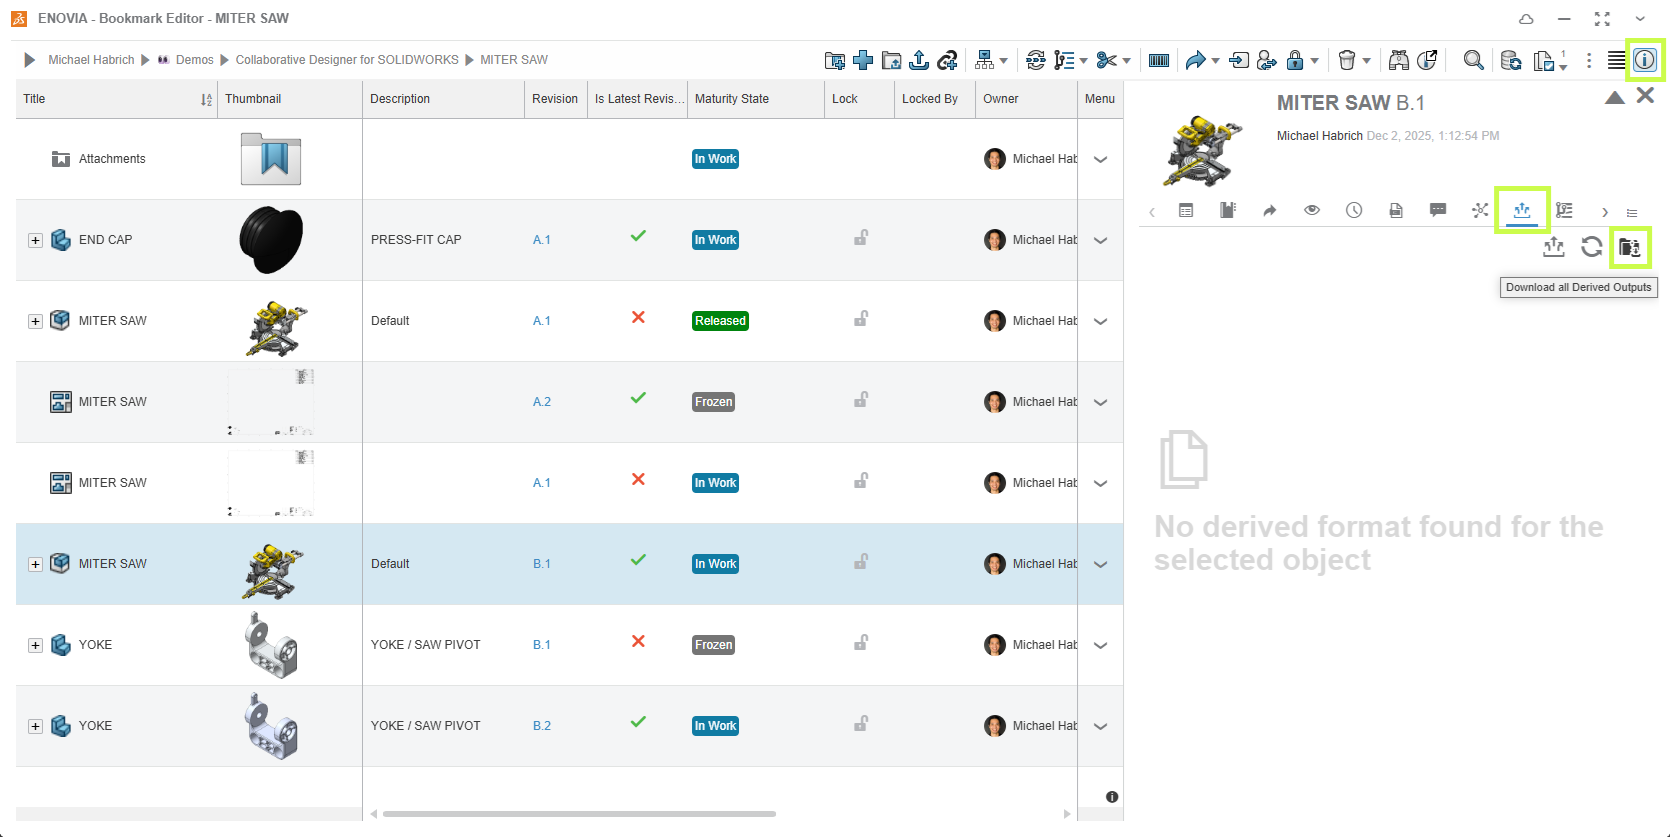
2. Right-click the assembly and choose Information, or open the side panel

3. In the window or side panel, navigate to Derived Outputs.

4. Click Download All Derived Outputs.

Managing and exporting derived CAD outputs from the 3DEXPERIENCE environment

This workflow mirrors the single-assembly method in Product Explorer.

Trade-off:

  • ✔ Simple and clean

  • ✖ One assembly at a time

Method 2: Export Multiple Items from a Bookmark

This method works the same way as the multi-selection approach in Product Explorer.

1. Add all required assemblies or parts to a bookmark.

2. Select the files you want.

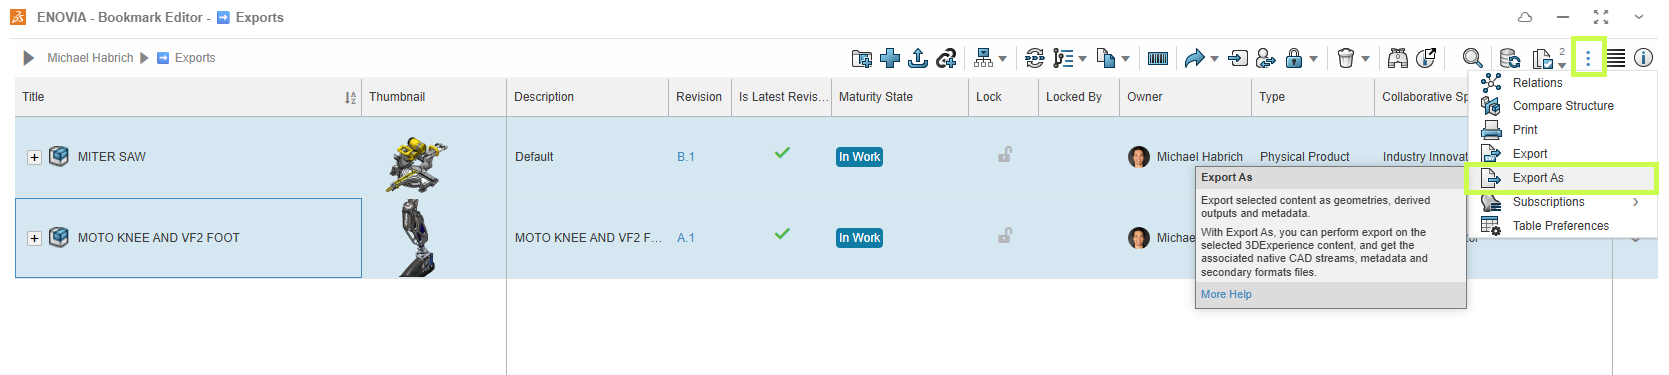
3. Click Export As from the upper toolbar.

Industrial design files being exported from the 3DEXPERIENCE platform for external use

4. Configure the Derived Format options and start the export.

As before, the resulting ZIP will include CAD data along with the Derived Outputs, so some cleanup may be required.

Trade-off:

  • ✔ Ideal for large batches or mixed content

  • ✖ Requires removing CAD files afterward

Final Thoughts

Whether you’re sending a single PDF or packaging dozens of STEP and DXF files, the 3DEXPERIENCE platform gives you flexible ways to get the right data out securely and efficiently.

The key is choosing the method that best fits your situation:

  • Single assembly, clean output → Download All Derived Outputs

  • Multiple files, faster packaging → Export As

Looking to go further?


Michael Habrich

3DEXPERIENCE Specialist

X_green_halo

Any questions? Need help? Ask one of our experts.

Whether you’re ready to get started or just have a few more questions, you can contact us toll-free:

    3DDrive vs. 3DSpace: What’s the Difference?

    BLOG

    3DDrive vs. 3DSpace: What’s the Difference?

    The 3DEXPERIENCE platform includes a powerful set of tools designed to support collaborative product development. Two of the most commonly used apps for storing and managing files are 3DDrive and 3DSpace.

    At first glance, they can look similar, but they’re built for very different purposes. Understanding how each one is meant to be used will help your team work more efficiently and avoid confusion down the road.

    What Is 3DDrive?

    Think of 3DDrive as the 3DEXPERIENCE equivalent of tools like Dropbox or OneDrive.

    3DDrive allows you to:

    • Store and access files from anywhere

    • Edit and collaborate on documents in real time

    • Share files easily, including with external users

    • Integrate with other cloud storage services

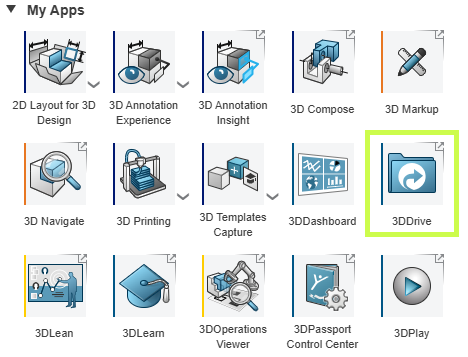
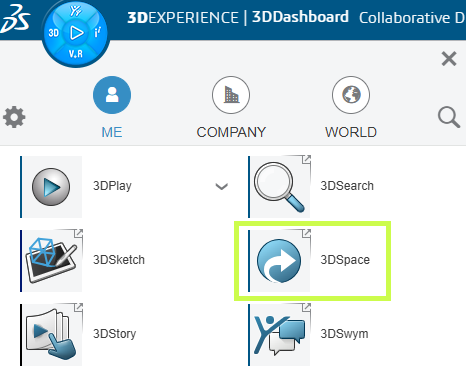
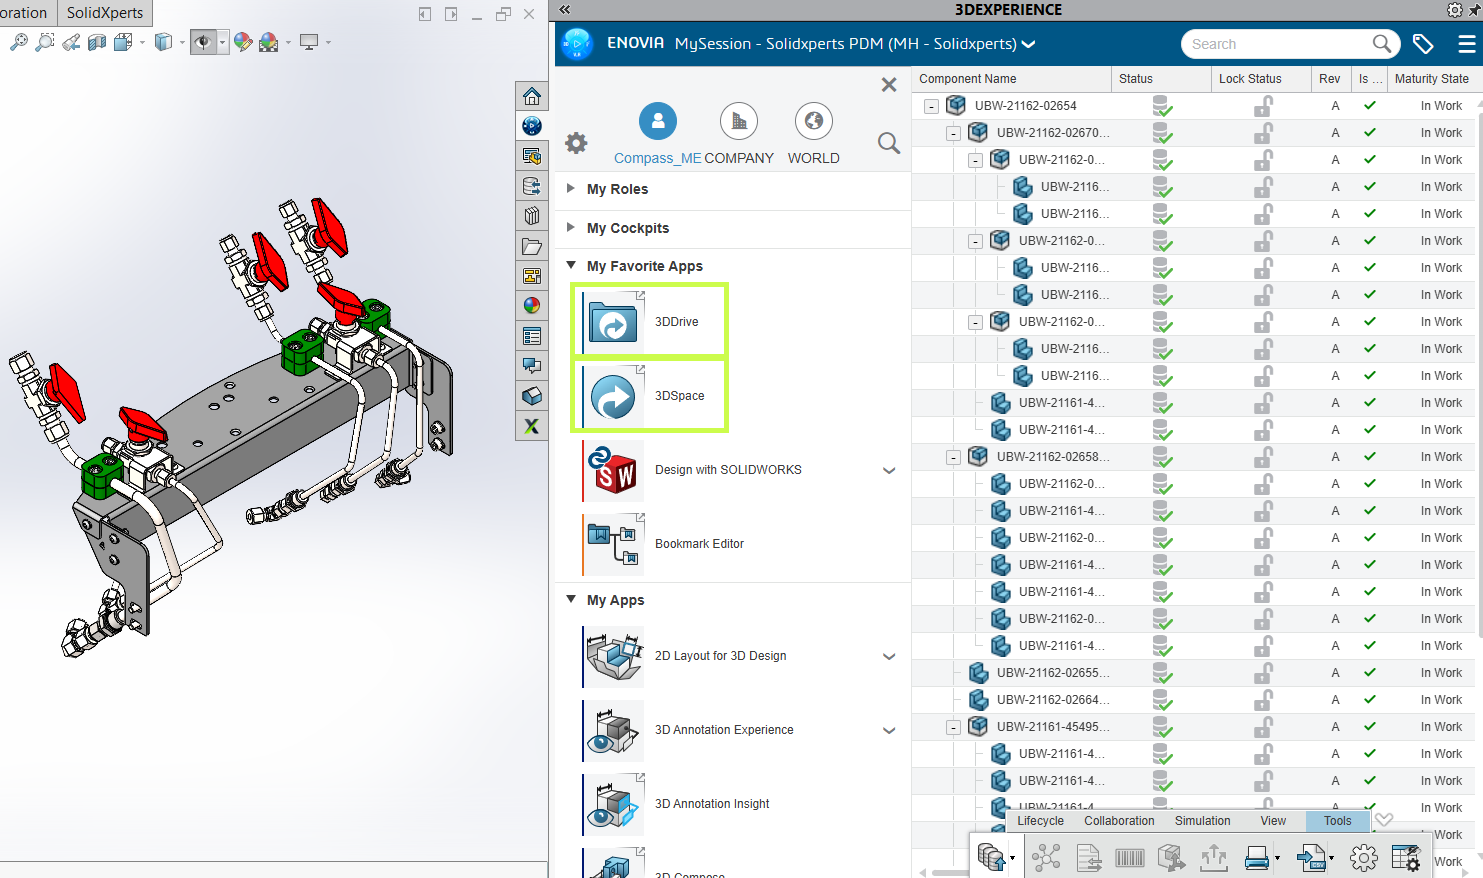
    You’ll find 3DDrive under My Apps in the 3DEXPERIENCE platform, and it’s also accessible directly inside SOLIDWORKS.

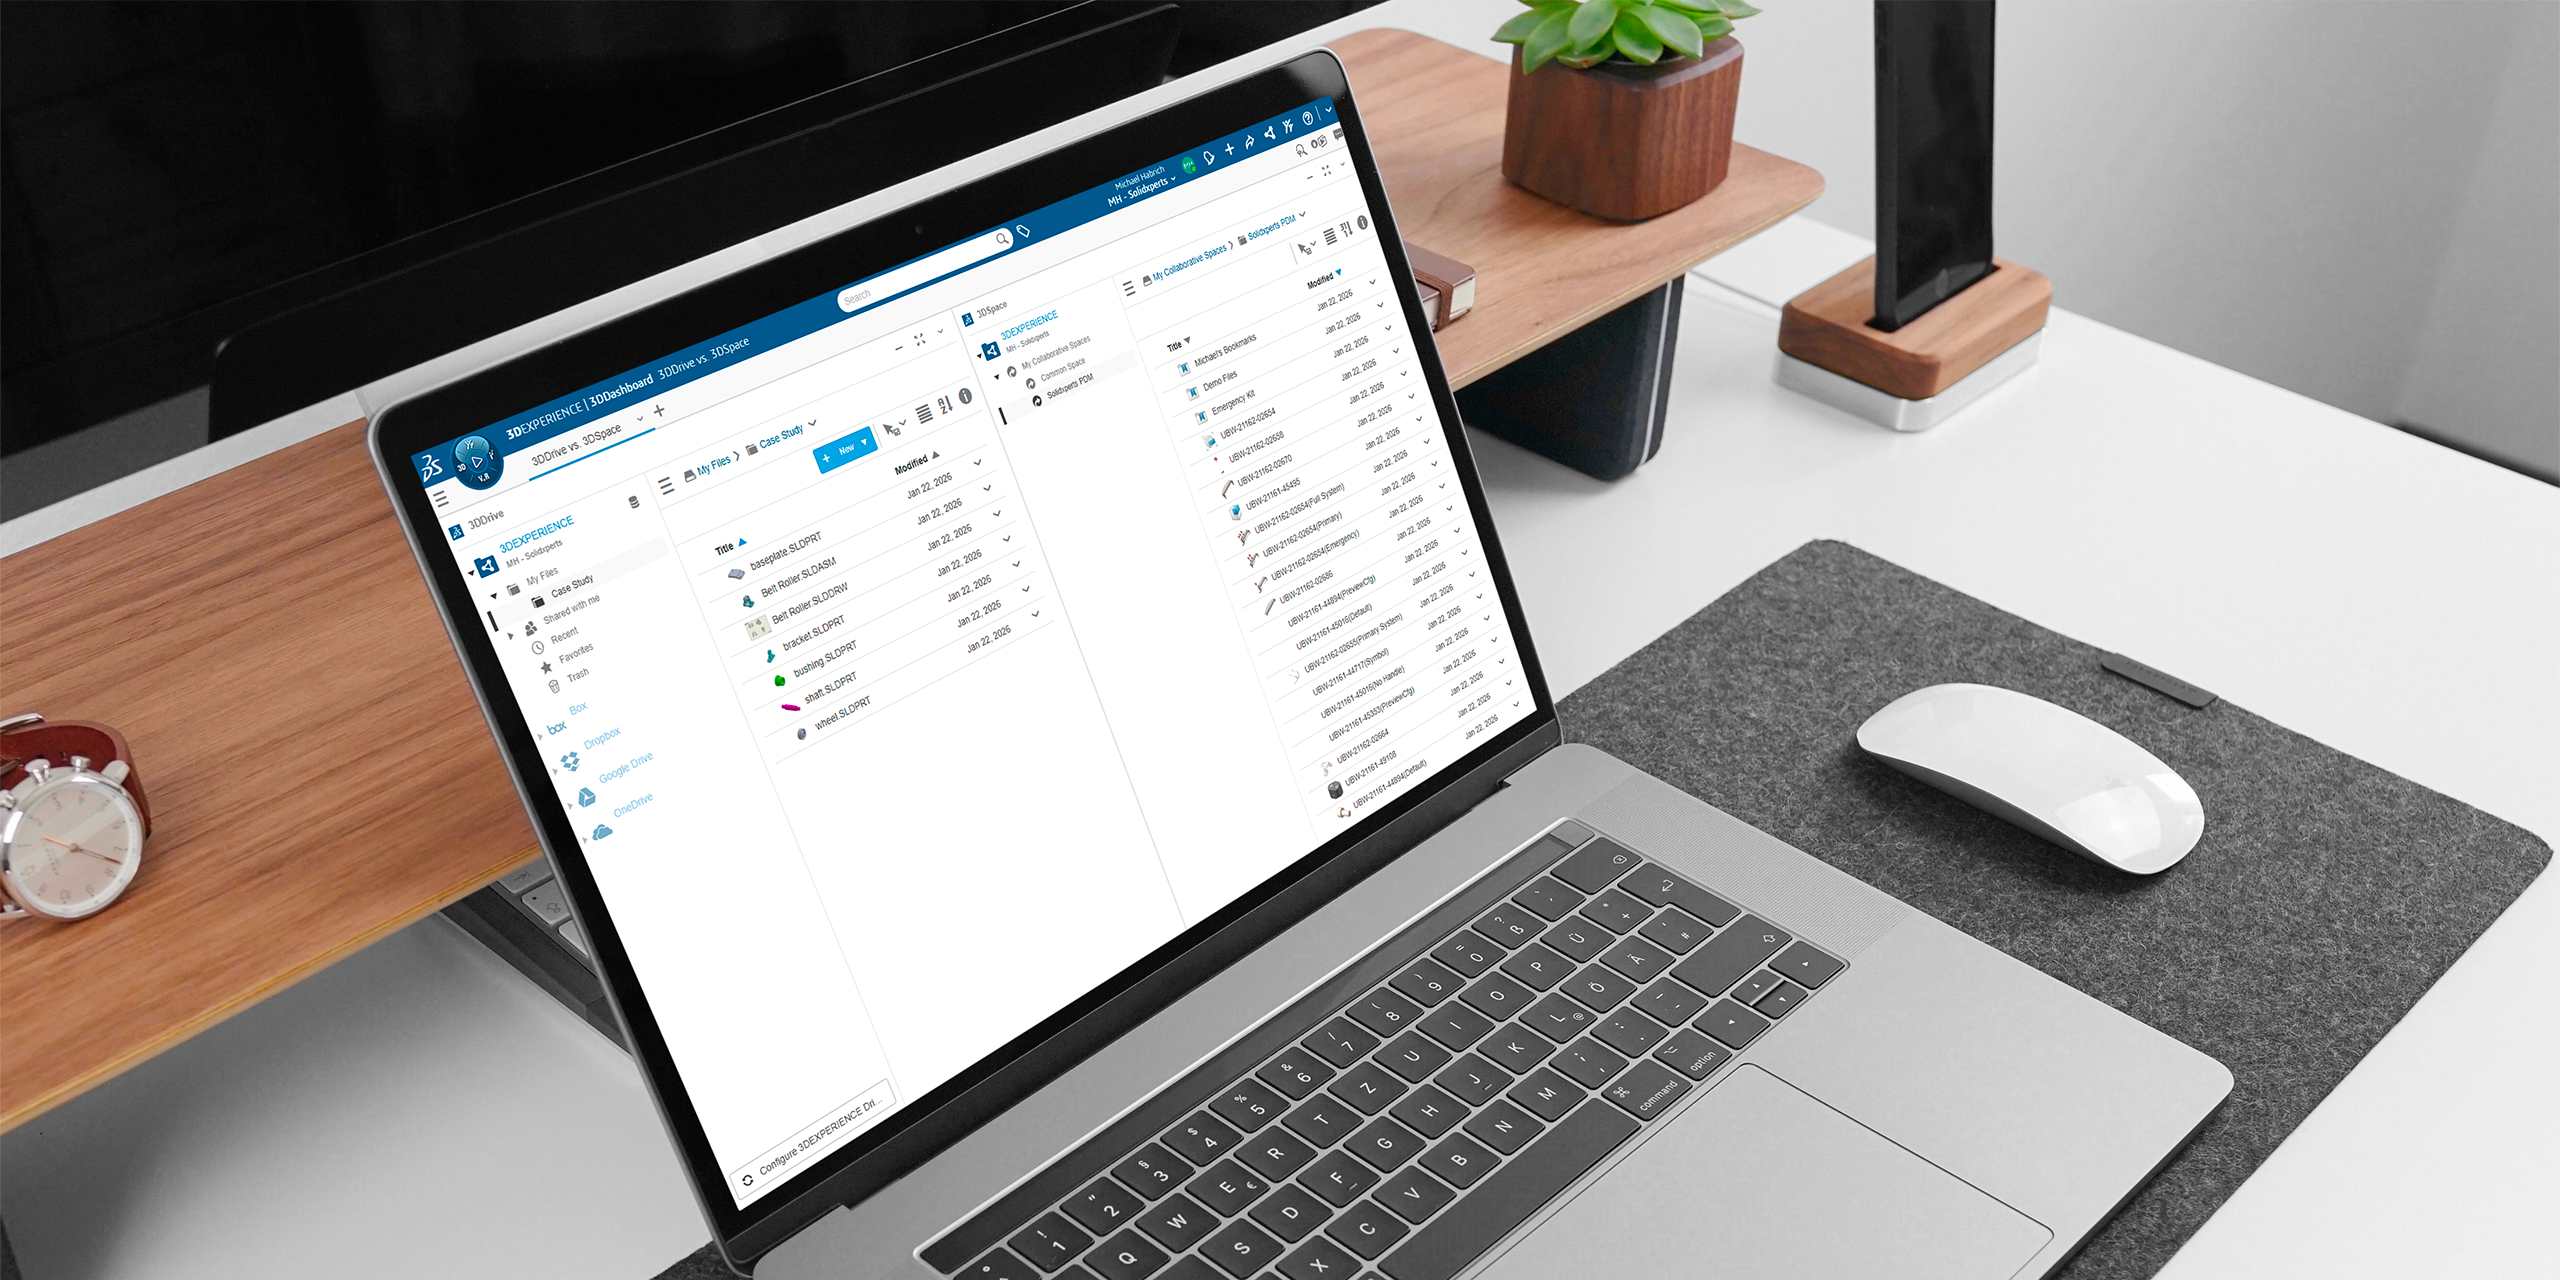
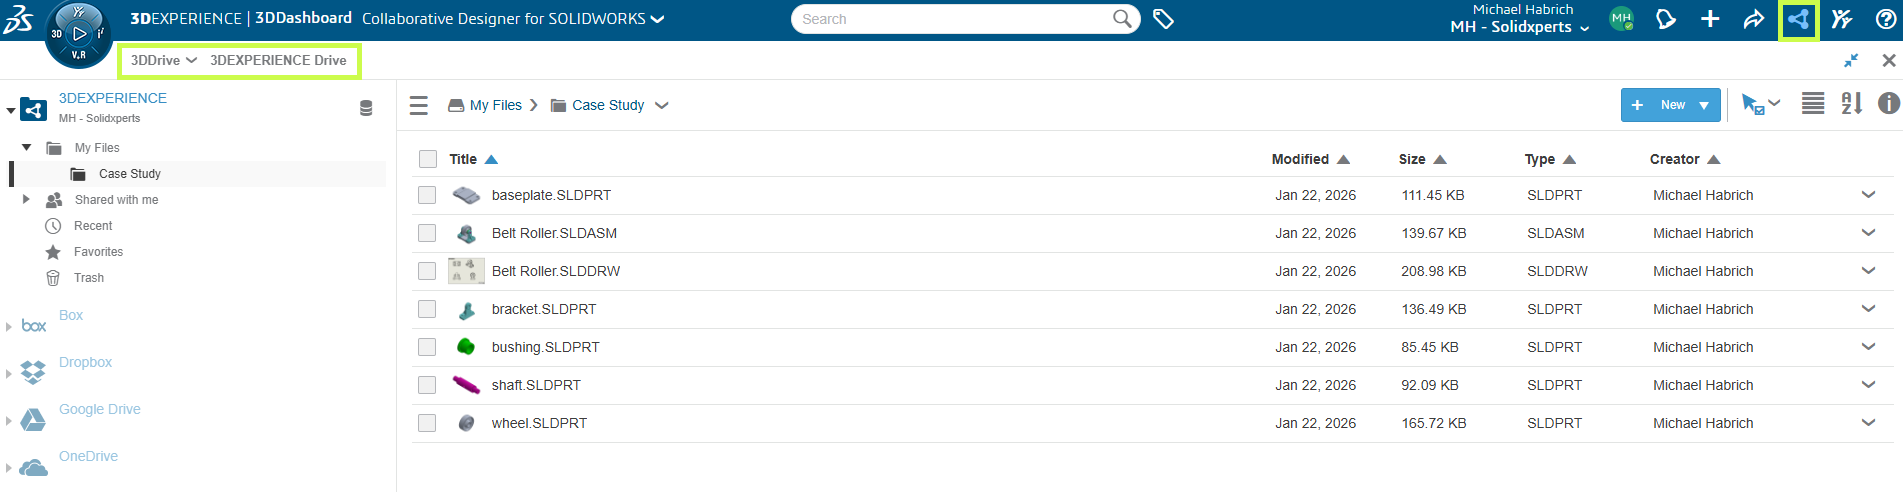
    3DDrive interface in the 3DEXPERIENCE platform for cloud file sharing and management

    3DDrive uses a familiar folder based structure and focuses on flexibility and convenience. It’s a great choice for:

    • General file sharing

    • Early-stage collaboration

    • Working with customers, suppliers, or partners outside your organization

    What it doesn’t include is built-in product data management there’s no revision control, lifecycle states, or formal approval process.

    3DDrive interface in the 3DEXPERIENCE platform for cloud file sharing and management

    What Is 3DSpace?

    3DSpace is built for teams that need structure, control, and traceability.

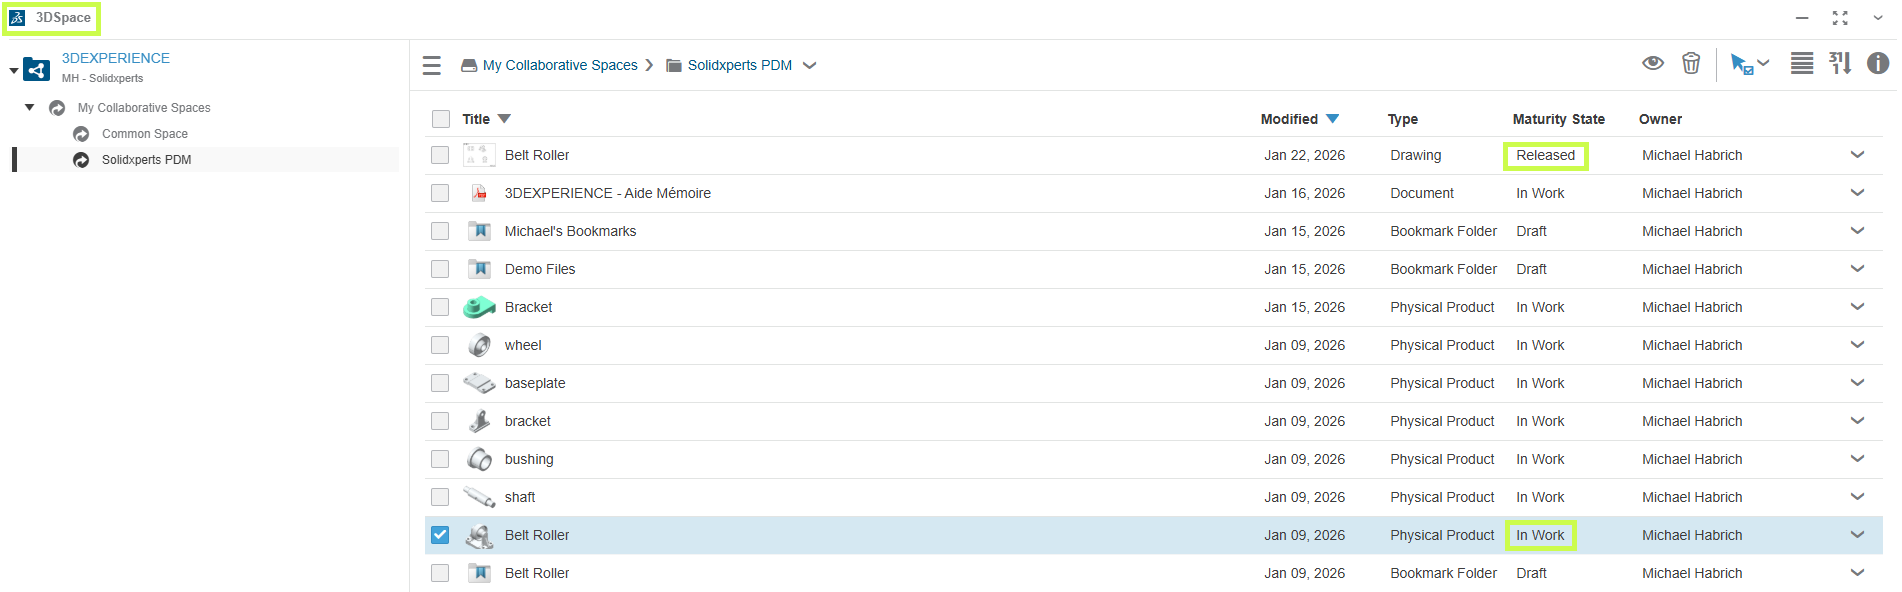
    3DSpace interface in the 3DEXPERIENCE platform for product data management and revision control

    Instead of simple folders, 3DSpace is organized around Collaborative Spaces, where teams work together on shared project data. Within 3DSpace, you can:

    • Control access and permissions

    • Track revisions and history

    • Assign maturity states like In Work and Released

    • Lock files to prevent conflicting edits

    These capabilities make 3DSpace a strong foundation for PLM-driven workflows, including:

    • Engineering change processes

    • Approval workflows

    • Long-term product data management

    3DSpace is ideal for engineering teams that need confidence in version control and data integrity.

    3DSpace interface in the 3DEXPERIENCE platform for product data management and revision control

    3DDrive vs. 3DSpace: Which Should You Use?

    The short answer: it depends on how you work.

    • 3DDrive is best when:

      • You need fast, flexible file sharing

      • You collaborate frequently with external users

      • You want a familiar, lightweight cloud storage experience

    • 3DSpace is best when:

      • You need controlled access and revision tracking

      • Your team is ready for PLM-style workflows

      • Data accuracy, traceability, and approvals matter

    The good news is that both apps integrate directly with SOLIDWORKS, so you can access the right tool without leaving your design environment.

    Comparison between 3DDrive and 3DSpace in 3DEXPERIENCE showing file sharing and product data management

    Final Thoughts

    3DDrive and 3DSpace aren’t competing tools. They’re complementary. Many teams start with 3DDrive for simple collaboration and gradually introduce 3DSpace as their data management needs grow.

    Not sure which approach makes the most sense for your team? That’s where we come in.


    Michael Habrich

    3DEXPERIENCE Specialist

    X_green_halo

    Any questions? Need help? Ask one of our experts.

    Whether you’re ready to get started or just have a few more questions, you can contact us toll-free:

      Guide: Getting Started with AI in SOLIDWORKS

      BLOG

      Guide: Getting Started with AI in SOLIDWORKS

      Artificial Intelligence is quickly becoming part of everyday engineering workflows, but if you’re a SOLIDWORKS user, the big question is usually:

      “Where do I even start?”

      The good news is that AI in SOLIDWORKS isn’t something separate you need to learn from scratch. It’s already being integrated into the tools you use every day through the 3DEXPERIENCE platform.

      In this guide, we’ll walk through everything you need to get started, step by step:

      • Required software and prerequisites

      • Activating the 3DEXPERIENCE platform

      • Installing the Design with SOLIDWORKS connector

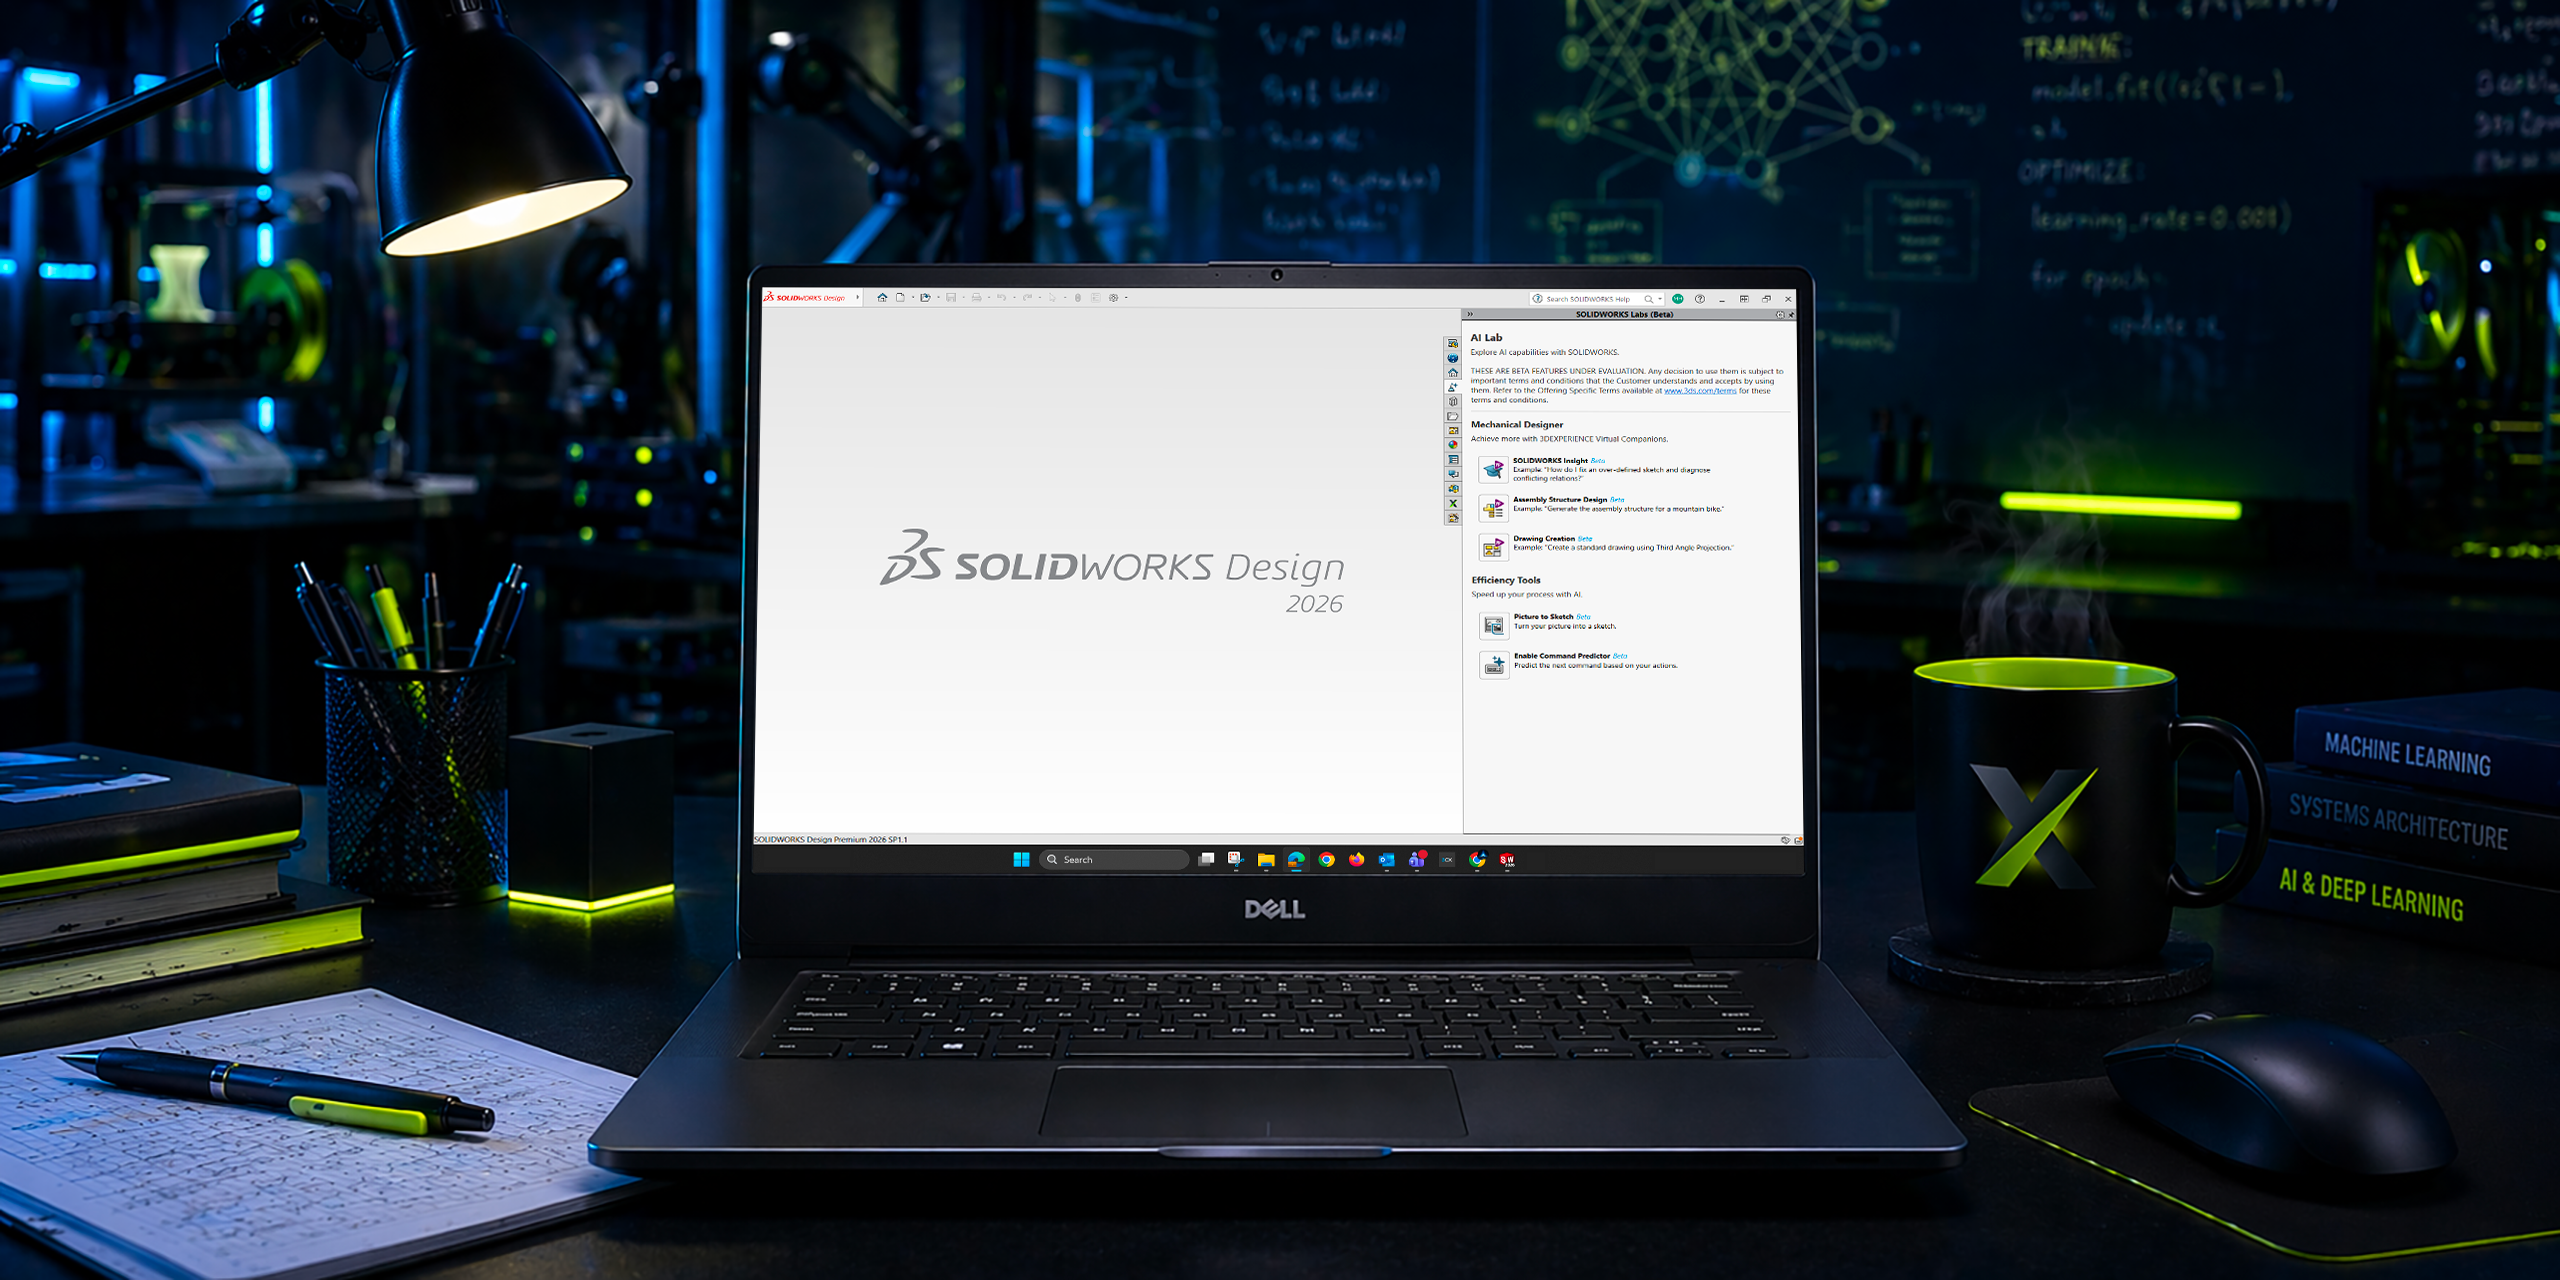
      • Accessing AI tools like the new AI Labs tab

      No fluff, just what you need to get up and running.

      Step 1: Understand What “AI in SOLIDWORKS” Actually Means

      Before jumping into setup, it’s important to clarify something:

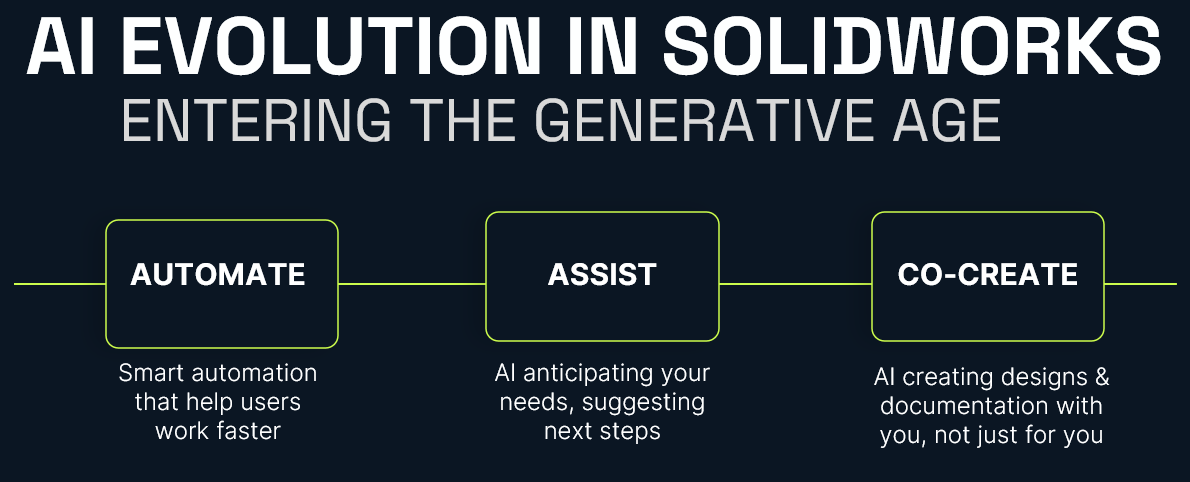
      AI in SOLIDWORKS isn’t a single feature. It’s a set of capabilities delivered through the 3DEXPERIENCE platform.

      Today, that includes things like:

      • Design assistance and recommendations

      • Automation of repetitive tasks

      • Data-driven insights

      • Early access tools in AI Labs

      In other words, AI is layered into your workflow, not replacing it.

      Step 2: Confirm Your Prerequisites

      Before you can access any AI-driven tools, you’ll need a few key components in place.

      Required Software

      • SOLIDWORKS 2026 (or newer)

      • Active subscription (required for cloud services integration)

      Platform Access

      • A 3DEXPERIENCE platform account

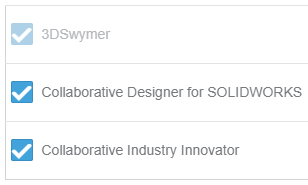
      • Assigned roles (including Collaborative Designer for SOLIDWORKS)

      System Requirements

      • Stable internet connection

      • Admin rights for installation

      • Browser access to the platform

      If you’re missing any of these, that’s your starting point.

      Step 3: Activate the 3DEXPERIENCE Platform

      AI functionality depends on your connection to the 3DEXPERIENCE platform.

      How to Activate:

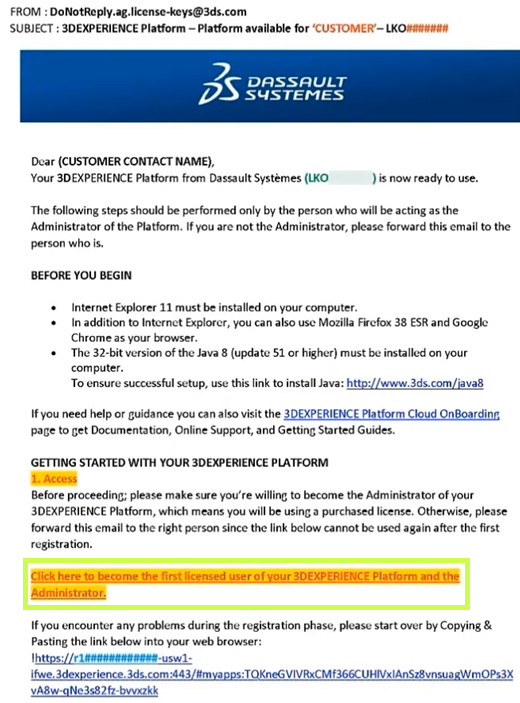
      • Check your welcome email from Dassault Systèmes
      • Click the activation link
      • Set your password and log in
      • Access your platform dashboard

      Once inside, you should see your roles and available apps.

      Still confused? Follow our Getting Started guide:
      Getting Started with the 3DEXPERIENCE Platform

      Step 4: Install the 3DEXPERIENCE Launcher

      Before installing any apps, you’ll need the 3DEXPERIENCE Launcher.

      Steps:

      • Log into your 3DEXPERIENCE platform
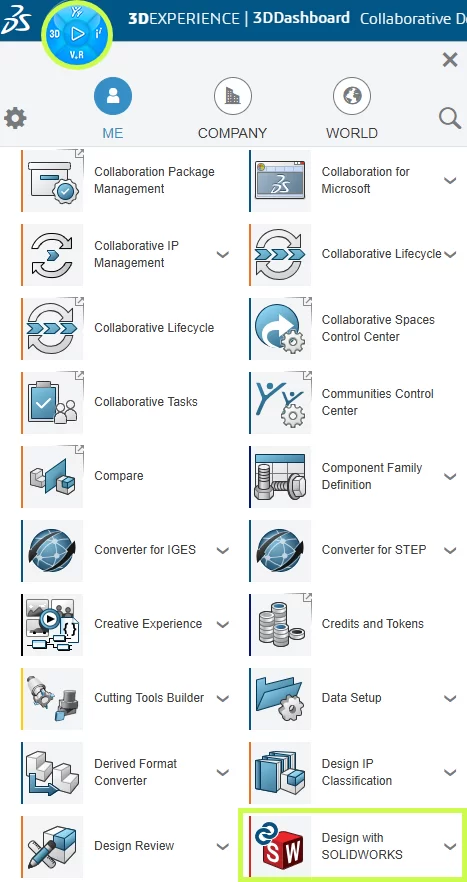
      • Navigate to the Compass (top-left menu)
      • Scroll down to My Apps and locate Design with SOLIDWORKS.
      • Select the app to begin the installation.
      • Click Install Launcher when prompted
      • Run the installer

      This tool acts as the bridge between your browser and desktop applications.

      Step 5: Install “Design with SOLIDWORKS”

      This is the most important step.

      The Design with SOLIDWORKS connector is what links your desktop SOLIDWORKS environment to the platform, and enables AI-driven features.

      Installation Steps:

      • In the platform, search for Design with SOLIDWORKS
      • Click Install
      • Accept default settings (recommended)
      • Complete installation
      • Restart your machine if prompted

      Once installed, your environment is officially “connected.”

      Having trouble? Check out our installation guide:
      Connect SOLIDWORKS Desktop to the 3DEXPERIENCE Platform

      Step 6: Launch SOLIDWORKS from the Platform

      This step is often missed, however, it is absolutely critical.

      First Launch:

      • Go to the platform
      • Click Open on Design with SOLIDWORKS
      • Launch SOLIDWORKS from the browser

      Why this matters:

      This ensures:

      • Your session is authenticated
      • The connector is active
      • Cloud services are initialized

      If you launch SOLIDWORKS directly from your desktop first, you may not be connected properly.

      Step 7: Verify the 3DEXPERIENCE Add-in

      Once SOLIDWORKS opens, confirm everything is working.

      Check:

      • A 3DEXPERIENCE tab appears in the task pane
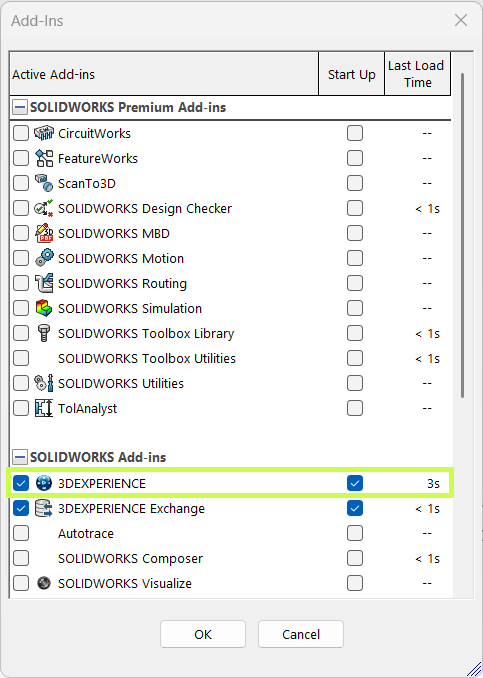
      • Add-in is enabled under:
        Tools > Add-ins

      If it’s not active:

      • Enable it manually
      • Restart SOLIDWORKS if needed

      This confirms your system is fully connected.

      Step 8: Access the AI Labs Tab

      Now we get to the interesting part.

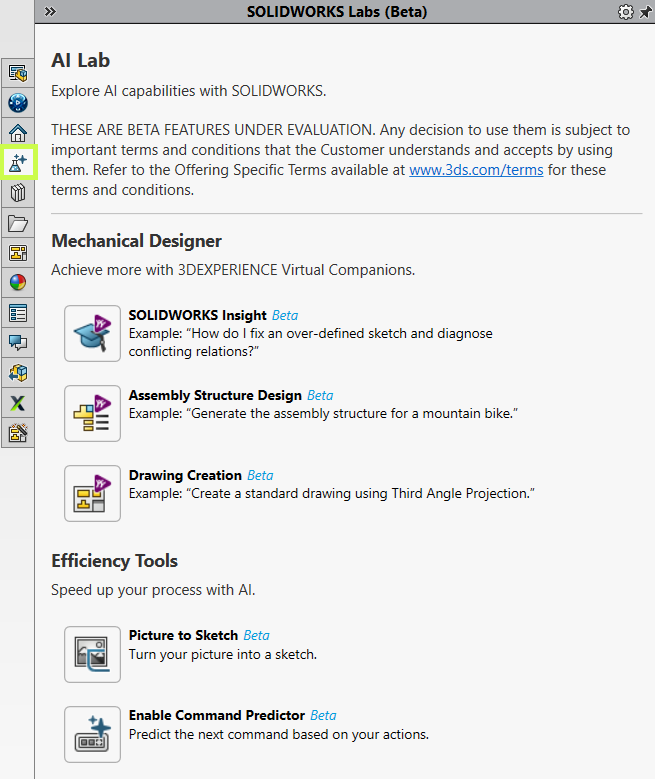
      With everything configured, you should have access to AI Labs, where new AI-driven tools are introduced.

      Where to Find It:

      • Inside SOLIDWORKS (Task Pane)
      • Look for AI Labs tab

      What You’ll Find:

      • Experimental AI features
      • Early access tools
      • Workflow enhancements powered by AI

      These features evolve quickly, so expect changes over time.

      Step 9: Start Using AI Features (Practical Examples)

      Once inside AI Labs or connected tools, start small.

      Good First Use Cases:

      • Automating repetitive design steps
      • Getting design suggestions
      • Exploring data-driven insights

      What Not to Expect:

      • Fully automated design generation
      • “One-click engineering”

      AI is there to assist, not replace your expertise.

      Step 10: Best Practices for Getting Started

      This is where most teams succeed or struggle.

      ✔ Start Small

      Don’t try to overhaul your entire workflow.

      ✔ Focus on Real Problems

      Look for:

      • Repetitive tasks
      • Bottlenecks
      • Manual processes

      ✔ Validate Everything

      AI suggestions still require engineering judgment.

      ✔ Train Your Team Gradually

      Adoption works best when it’s incremental.

      Final Thoughts: Where AI in SOLIDWORKS Is Headed

      AI in SOLIDWORKS is evolving, but the direction is clear:

      • More automation of low-value tasks
      • Better decision support
      • Deeper integration with simulation and data

      And importantly:

      SOLIDWORKS isn’t being replaced, it’s being enhanced.

      For most teams, the real opportunity isn’t jumping ahead, it’s simply getting started.

      For more information on AI in SOLIDWORKS, reach out to us through our website:
      SOLIDWORKS AI: Transform Your Design with Artificial Intelligence


      Michael Habrich

      3DEXPERIENCE Specialist

      X_green_halo

      Any questions? Need help? Ask one of our experts.

      Whether you’re ready to get started or just have a few more questions, you can contact us toll-free:

        Connecting SOLIDWORKS Desktop to the 3DEXPERIENCE Platform

        BLOG

        Connecting SOLIDWORKS Desktop to the 3DEXPERIENCE Platform

        The 3DEXPERIENCE platform includes a wide range of powerful, web-based apps, but many teams prefer to continue designing in the familiar SOLIDWORKS desktop environment. The good news? You don’t have to choose one or the other.

        By combining SOLIDWORKS desktop with the Design with SOLIDWORKS connector, you can keep your existing workflows and interface while taking full advantage of cloud-based file storage, sharing, and collaboration.

        In this article, we’ll walk through:

        • Installing the Design with SOLIDWORKS connector

        • Launching SOLIDWORKS with the 3DEXPERIENCE connection enabled

        • Saving files directly to the platform

        • Managing your local cache for best performance

        Installing Design with SOLIDWORKS

        First, once your 3DEXPERIENCE tenant is activated, or you’ve been invited to an existing one , linking SOLIDWORKS desktop to the platform is quick and straightforward.

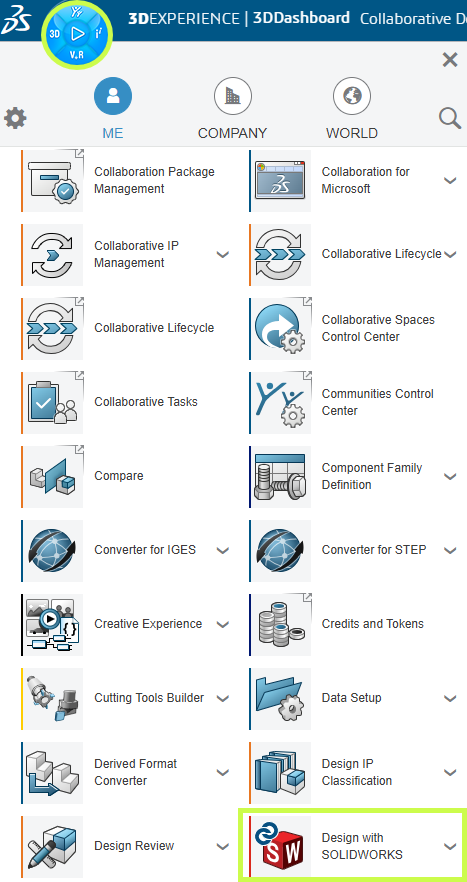
        • In the 3DEXPERIENCE interface, click the Compass icon in the upper-left corner.

        • Scroll down to My Apps and locate Design with SOLIDWORKS.

        • Select the app to begin the installation.

        Installing Design with SOLIDWORKS

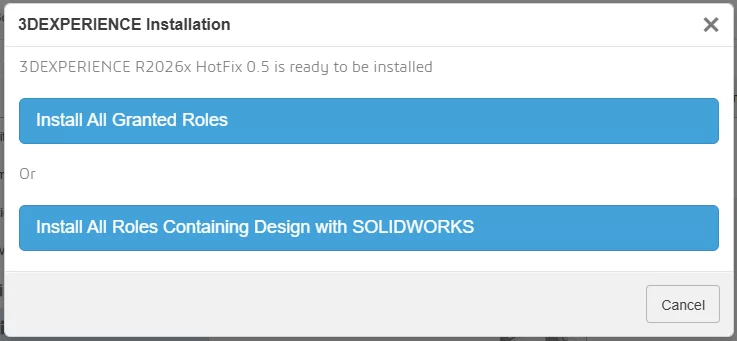
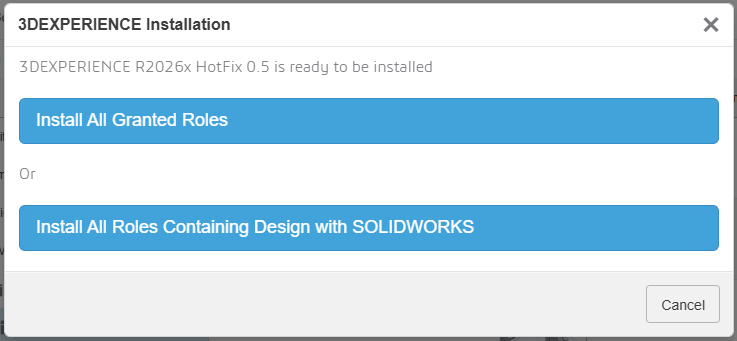
        During installation, you’ll be prompted to:

        • Install all granted roles, or

        • Install only the roles required for the Design with SOLIDWORKS connector

        Installing Design with SOLIDWORKS

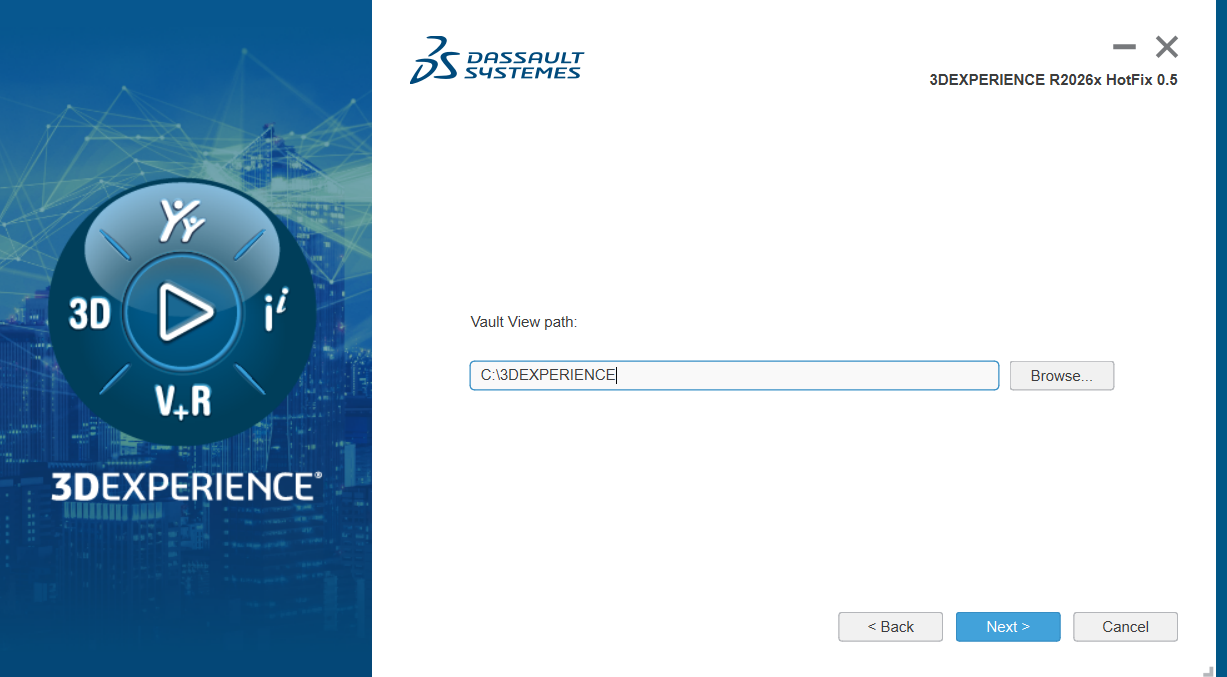
        The installer will then allow you to choose:

        • The installation directory

        • The location of your 3DEXPERIENCE cache

        By default, the cache is stored in C:\3DEXPERIENCE. Since the cache is managed directly from within SOLIDWORKS, you typically won’t need to access this folder manually.

        The cache is stored in C:\3DEXPERIENCE

        Once installation is complete, the connector is added to your system.

        Enabling the 3DEXPERIENCE Add-In in SOLIDWORKS

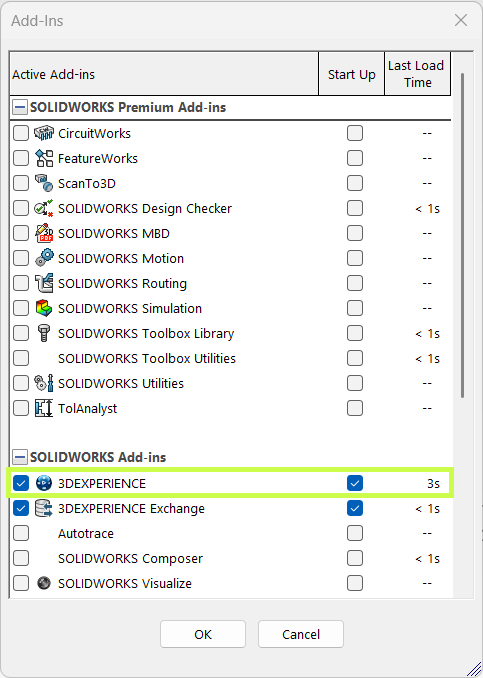
        Before using the connector, take a moment to confirm the 3DEXPERIENCE add-in is enabled in SOLIDWORKS.

        • Launch SOLIDWORKS.

        • Go to Settings > Add-Ins.

        • Verify that the 3DEXPERIENCE add-in is installed and checked.

        Enabling the 3DEXPERIENCE Add-In in SOLIDWORKS

        This ensures SOLIDWORKS can communicate properly with the platform.

        Launching SOLIDWORKS with the Connector

        One important workflow change to be aware of is how you launch SOLIDWORKS.

        • Launching SOLIDWORKS from a desktop shortcut or system search opens the standard desktop version without the 3DEXPERIENCE connection.

        • To use the connector, launch Design with SOLIDWORKS instead.

        This starts SOLIDWORKS with full 3DEXPERIENCE functionality enabled.

        You can also:

        • Use the dropdown next to Design with SOLIDWORKS to check for updates or uninstall

        • Create a dedicated desktop shortcut for Design with SOLIDWORKS, allowing you to access cloud functionality without opening a web browser

        Launching SOLIDWORKS with the Connector

        Saving Files to the 3DEXPERIENCE Platform

        Once connected, saving files to the cloud is seamless.

        You can:

        • Use Save to 3DEXPERIENCE from the File menu (alongside Save and Save As), or

        • Use the 3DEXPERIENCE Task Pane, added by the add-in

        The task pane lets you:

        • Browse your tenant

        • Search for existing data

        • Right-click and save files directly to the platform

        And if needed, you can still save files locally, the connector doesn’t force you into a cloud-only workflow.

        Saving Files to the 3DEXPERIENCE Platform

        Managing the 3DEXPERIENCE Cache

        When you open or edit files stored on the platform, they’re downloaded locally to your 3DEXPERIENCE cache. Keeping this cache clean can significantly improve performance.

        The 3DEXPERIENCE add-in makes cache management easy:

        • Delete individual cached files

        • Use the cleanup tool to remove files older than a specified date

        The cleanup utility is smart. It automatically skips:

        • Files referenced by assemblies

        • Files not yet saved to the platform

        • Files that are currently locked

        This helps you clear space without risking your data.

        Saving Files to the 3DEXPERIENCE Platform

        Final Thoughts

        The Design with SOLIDWORKS connector bridges the gap between SOLIDWORKS desktop and the 3DEXPERIENCE platform, giving you the best of both worlds. You get cloud-based collaboration and data management without changing how you design.

        If you need help installing the connector, optimizing your workflow, or rolling this out to your team, your Solidxperts team is here to help.

        Looking to learn more?

        • Explore additional articles and tutorials

        • Connect with other users and experts

        • Or reach out to us! We’re always happy to help you get the most out of your tools


        Michael Habrich

        3DEXPERIENCE Specialist

        X_green_halo

        Any questions? Need help? Ask one of our experts.

        Whether you’re ready to get started or just have a few more questions, you can contact us toll-free:

          7 Myths About AI: Demystifying Bias and Technological Limits

          BLOG

          7 Myths About AI: Demystifying Bias and Technological Limits

          Every wave of innovation in artificial intelligence (AI) brings real technological progress, along with a dramatic rise in hype. With every breakthrough, new narratives emerge: AI is portrayed as “magical,” endowed with its own will, on the verge of becoming superhuman, or conversely as something completely uncontrollable by law.

          As a result, this fog of myths makes AI opaque to the public, complicates decision-making for organizations, and distracts attention from the real technical and societal challenges.

          In this article, we aim to clarify two key questions:

          • What are the main myths currently surrounding AI?

          • And what technical, physical, and social realities help dismantle them?

          The Major Myths Shaping Our View of AI

          Several myths structure today’s collective imagination about artificial intelligence.

          “AI has agency.”
          The idea that AI systems act on their own initiative, with intentions, goals, or desires.

          “Superintelligence is imminent.”
          The belief that we are only a few years, or even months, away from a general intelligence far surpassing human capabilities.

          “AI can be objective or impartial.”
          The assumption that algorithms are inherently neutral because they rely on computation.

          “AI has a clear definition.”
          As if AI referred to a single, clearly defined technology, when in reality no universal definition exists.

          “Ethical guidelines are enough to protect us.”
          The perception that voluntary ethical charters are sufficient safeguards against harmful AI uses.

          “AI cannot be regulated.”
          The claim that technological innovation moves too fast for legal systems to keep up.

          “AI can solve any problem.”
          The idea that AI is a universal solution applicable to any technical, economic, or social challenge.

          In reality, these myths stem from a mixture of marketing, science fiction, and technical misunderstanding. To move beyond them, we need to return to what AI actually is today.

          1. Agency and Consciousness: AI as a “Stochastic Parrot”

          One of the most common misconceptions is attributing intention to AI. We often talk about what AI “wants,” “decides,” or “thinks.” Yet modern systems, especially large language models (LLMs), function much more simply.

          Models That Predict, Not Understand

          An LLM does not interpret your sentences in the human sense. Technically, it:

          • receives a sequence of tokens (pieces of words) as input

          • computes a probability distribution over the next token using a trained neural network

          • selects or samples the next token according to this distribution

          • repeats the process until a complete response is produced

          This mechanism relies on massive statistical correlations learned during training. At no point does the system possess:

          • semantic understanding of concepts

          • an internal model of the world comparable to a human’s

          • independent intentions or goals

          In other words, what researchers sometimes call a “stochastic parrot”: a machine that reproduces learned language structures in sophisticated probabilistic combinations.

          Anthropomorphism as a Persistent Bias

          If these systems appear to “think,” it is largely because humans naturally anthropomorphize systems that display seemingly intelligent behavior. This cognitive bias is central to many misunderstandings about AI today.

          2. Superintelligence and the Resource Wall

          Another dominant narrative suggests that we are on the verge of general superintelligence, held back only by corporate caution. However, the actual infrastructure behind AI tells a different story.

          The Data Wall: A Finite Resource

          Today’s large models rely on enormous volumes of high-quality human-generated data: text, conversations, code, and multimedia content. But this resource is not infinite.

          Estimates suggest that high-quality training data suitable for ever-larger models could be largely exhausted between 2026 and 2032. Beyond that point:

          • existing datasets would be reused repeatedly, yielding limited improvements

          • or synthetic data would be used, introducing new risks and feedback loops

          Physical Constraints and Diminishing Returns

          The idea of unlimited growth in model power faces several practical limits.

          Energy and cooling constraints
          The computing density required for training and deploying the largest models pushes data centers toward limits in:

          • electrical grid capacity

          • cooling infrastructure needed to dissipate heat

          Hardware limits
          GPUs and other accelerators are approaching physical limits in terms of performance per watt and cost efficiency.

          Diminishing returns
          Scaling models by increasing parameters, data, or compute still improves performance, but each additional gain becomes smaller relative to the resources invested.

          These “resource walls” do not prevent progress, but they challenge the idea of a straightforward path toward limitless superintelligence.

          3. Objectivity and Impartiality: AI as a Mirror of Human Bias

          AI is often presented as a way to eliminate human bias. In reality, AI systems frequently inherit and sometimes amplify existing inequalities.

          Data Bias: Who Is Represented?

          Models can only generalize effectively if training data represent a sufficiently diverse set of situations and populations.

          When datasets are imbalanced, performance degrades unevenly. Studies have shown, for instance, that some facial recognition systems exhibit error rates up to 35% higher for darker-skinned women than for white men.

          This is not an isolated bug. It reflects underlying representation biases in the data.

          Design Bias: Optimization Choices Matter

          Even with balanced datasets, models reflect the priorities of their designers:

          • How is overall accuracy balanced against fairness between groups?

          • Which metrics are optimized during training and deployment?

          • What trade-offs are accepted between false positives and false negatives?

          These decisions directly shape who benefits from an AI system and who may be harmed. Claims of algorithmic objectivity often overlook these design choices.

          4. The Plural Architecture of AI

          Contrary to popular belief, “artificial intelligence” does not describe a single unified technology. Instead, it is an umbrella term covering a broad and heterogeneous set of methods, theories, and applications.

          A Hierarchy of Often-Confused Concepts

          Many people use AI, Machine Learning, and Deep Learning interchangeably, although they represent different levels of abstraction.

          Artificial Intelligence (AI)
          The broader field of computer science focused on creating systems capable of performing tasks that require human-like cognitive abilities.

          Machine Learning (ML)
          A subset of AI in which systems learn patterns from data rather than relying solely on explicit programming.

          Deep Learning (DL)
          A specialized ML approach using multi-layer neural networks to process complex data such as images, speech, or language.

          Divergent Definitions

          The meaning of AI changes depending on perspective.

          • Scientific definition: a research discipline exploring computational models of cognition.

          • Technological definition: systems capable of perceiving their environment and taking actions accordingly.

          • Popular definition: a largely anthropomorphic vision attributing awareness or autonomy to machines.

          A Fragmented Ecosystem

          AI is not monolithic. It includes multiple research traditions and technical approaches.

          Two historical families illustrate this diversity:

          Symbolic AI
          Systems based on logical rules and expert knowledge.

          Connectionist AI
          Statistical approaches based on large datasets and neural networks, including modern language models.

          Narrow AI vs General AI

          Today’s systems belong entirely to narrow AI, designed to perform specific tasks such as:

          • playing chess

          • recognizing objects in images

          • detecting fraud

          • generating text

          Artificial General Intelligence (AGI), capable of learning any intellectual task a human can perform, remains a speculative concept.

          5. Ethics, Marketing, and the Need for Regulation

          In response to AI risks, many organizations have adopted ethical charters and voluntary guidelines. While useful, these tools have clear limitations.

          Ethical Marketing

          Without enforcement mechanisms, many ethical charters function more as reputation tools:

          • they reassure stakeholders

          • they improve brand image

          • but they rarely prevent high-risk systems from being deployed

          Toward Enforceable Regulation: The EU AI Act

          Contrary to the myth that AI cannot be governed, regulatory frameworks are emerging.

          The European Union’s AI Act proposes a risk-based approach:

          • Unacceptable risk systems are banned

          • High-risk systems must comply with strict requirements including transparency, traceability, documentation, conformity assessments, and human oversight

          • Minimal risk systems face limited regulation

          The goal is not to slow innovation, but to ensure that AI systems remain accountable within existing legal frameworks.

          6. AI Is Not a Magic Wand

          Perhaps the most persistent myth is that AI can solve any problem.

          In reality, successful AI systems are:

          • specialized, designed for specific tasks such as image recognition, text summarization, fraud detection, or code generation

          • limited in common sense, often failing when faced with situations outside their training distribution

          • highly context-dependent, relying on data quality, system integration, and human oversight

          The same model may perform extremely well in a well-defined environment yet fail dramatically when conditions change or when real-world usage diverges from intended scenarios.

          AI as a Component, Not a Strategy

          For organizations, AI should be viewed as:

          • a technical component within a larger system architecture

          • integrated into a broader strategy involving governance, metrics, risk management, and human supervision

          The wrong question is:

          “How can we add AI everywhere?”

          The better question is:

          “On which well-defined problems does AI provide a real advantage compared to existing solutions?”

          Moving Beyond the Myths

          Today’s AI is neither a conscious entity, nor an imminent superintelligence, nor a universal solution.

          It is a set of powerful techniques deeply grounded in real-world constraints. These systems are limited by physical infrastructure such as energy, cooling, and hardware, as well as by the availability of data and computational resources. They are also shaped by the social structures and human biases embedded in the data and objectives guiding their development.

          By dismantling the myths surrounding AI, autonomous agency, imminent superintelligence, perfect objectivity, legal ungovernability, or universal applicability, we can ask better technical questions, design safer systems, and build more effective regulatory frameworks.

          Ultimately, understanding these realities allows us to treat AI for what it truly is: a powerful but specialized tool that must be used with rigor, transparency, and human oversight.

          If you have questions about AI and its practical applications, our experts are here to help. Contact us to start the conversation.


          Benoit Bilodeau

          Senior Solutions Architect

          X_green_halo

          Any questions? Need help? Ask one of our experts.

          Whether you’re ready to get started or just have a few more questions, you can contact us toll-free:

            Updated Instructions for Adding the Thumbnail Column in the 3DEXPERIENCE Platform

            BLOG

            Updated Instructions for Adding the Thumbnail Column in the 3DEXPERIENCE Platform

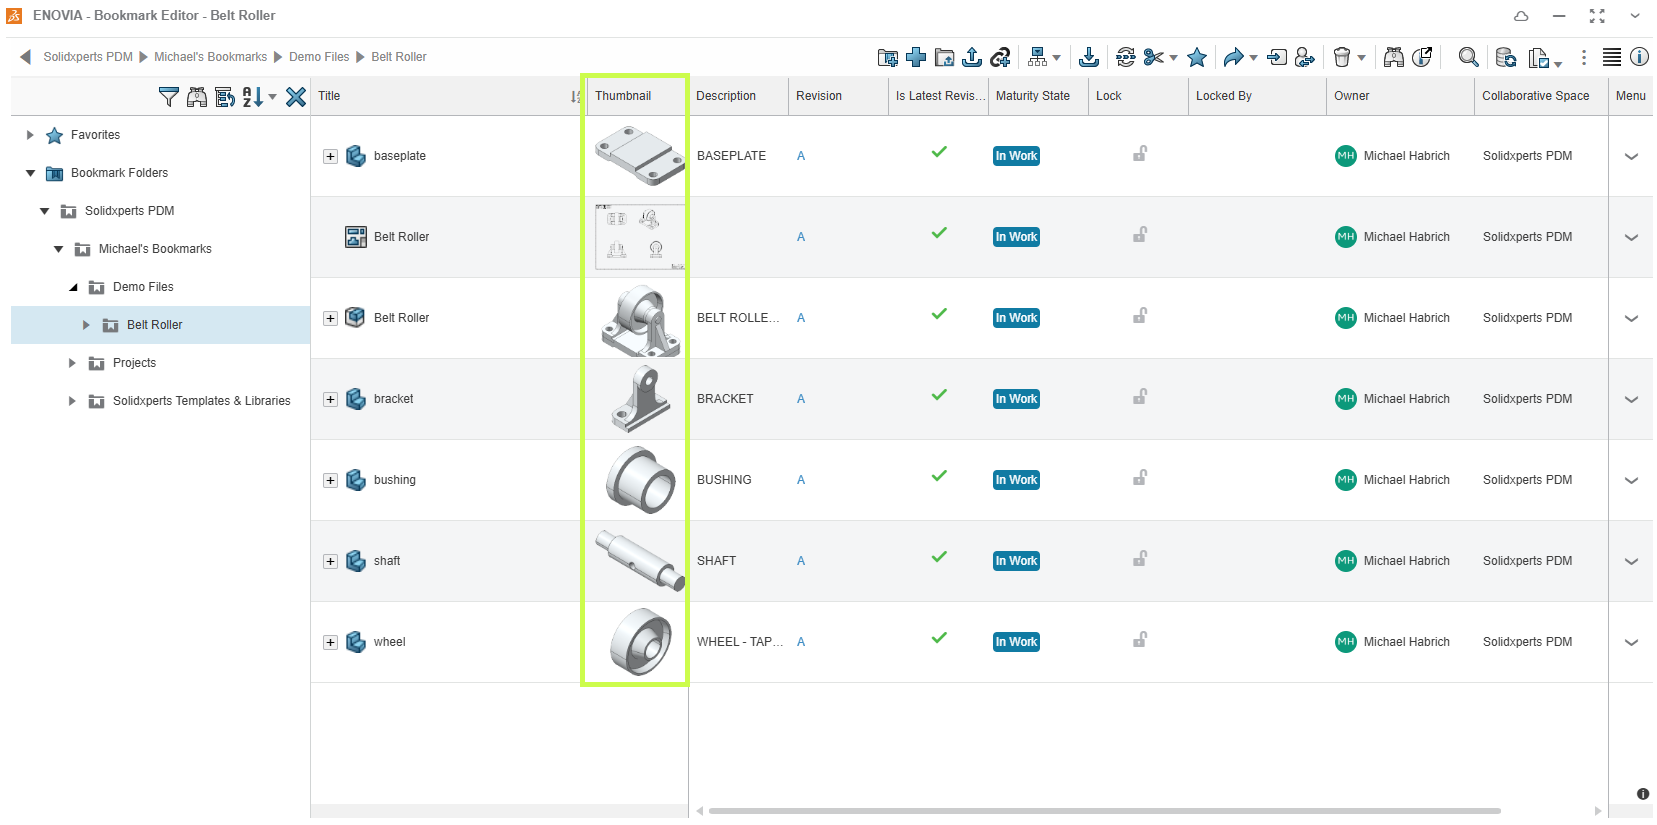
            If you use the Bookmark Editor inside the 3DEXPERIENCE platform, the Thumbnail column can be a great way to quickly recognize your content without digging through details. With the July 2025 update, the way you add this column (and a few others) has changed a little. No worries, we will walk you through it.

            Bookmark Editor

            Creating a Custom View

            To add the Thumbnail column, you’ll now need to work with a custom column view instead of the default one.

            • Right-click any column header in Bookmark Editor.
            • Select Table Preferences.
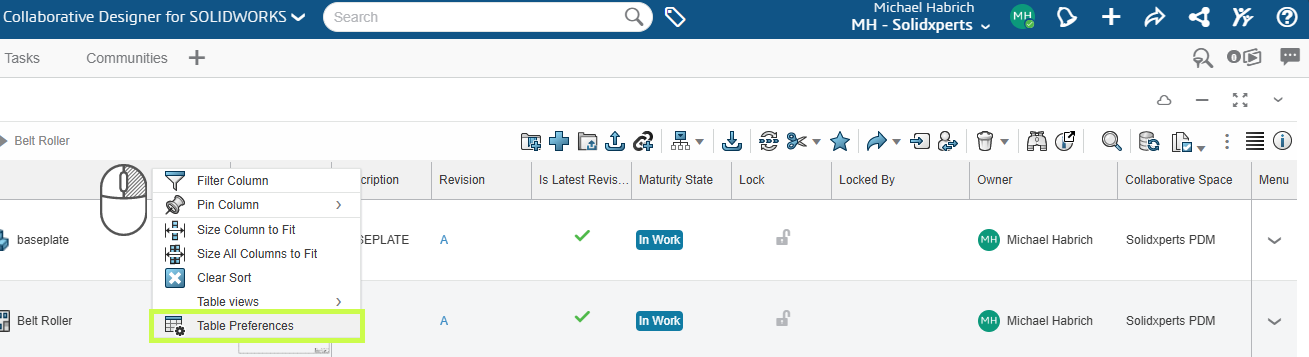
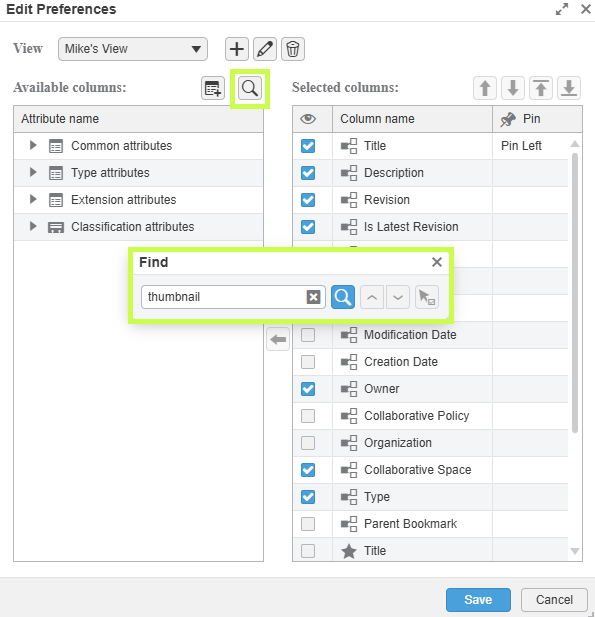
            Table Preferences in the 3DEXPERIENCE platform

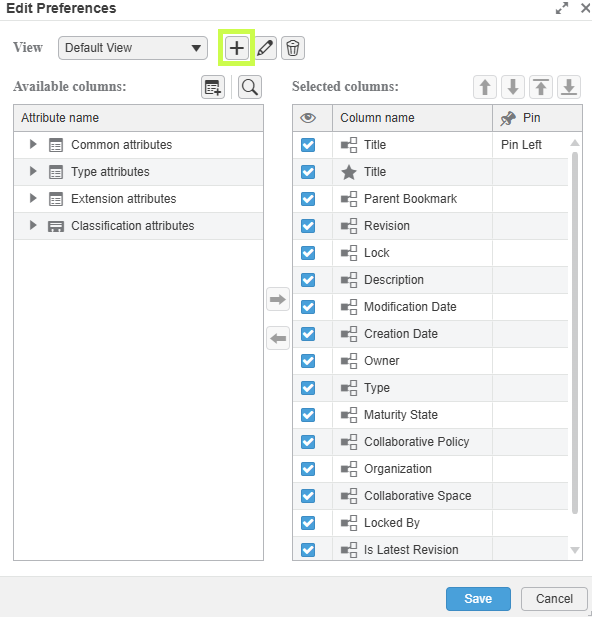
            You’ll see a dropdown at the top. Most users will currently be using Default.

            • Click the + icon to create your own view.
              • The platform will call it Copy of Default view by default.

            Edit Preferences

            • Rename it to something meaningful, maybe “My Thumbnail View”,and click the checkmark to confirm.

            Adding the Thumbnail Column

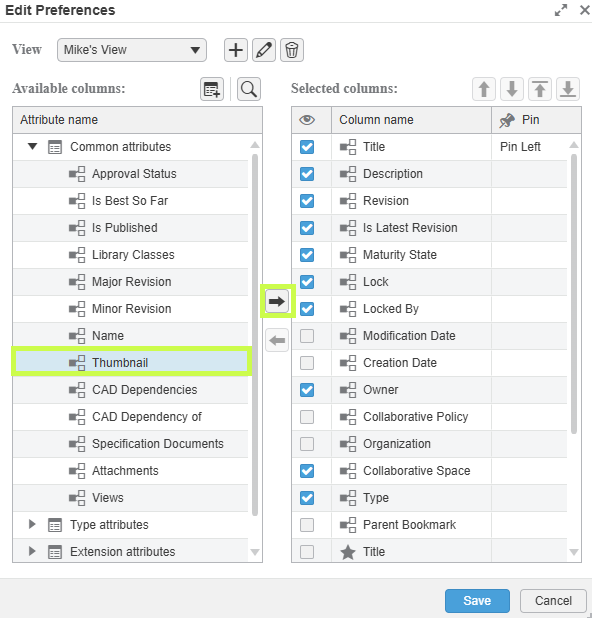
            You’ll now see two panels: Available Columns and Selected Columns.

            • Use the search bar or browse the list to find Thumbnail.
            • The Thumbnail column is located under Common Attributes.
            • Select it, then click the right-arrow to add it to your selected list.

            Adding the Thumbnail Column

            Adding the Thumbnail Column in the 3DEXPERIENCE platform

            Once it’s added:

            • Drag and drop the column to adjust its position, or
            • Use the up/down arrows to move it into place.

            If you’d like it to stay visible while scrolling, use Pin Left.

            Click Save when you’re done.

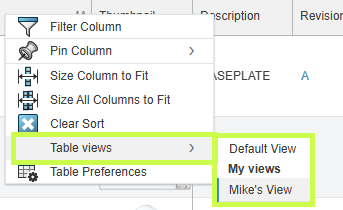
            Switching Between Views

            If you create more than one custom layout (or want to go back to the original):

            • Right-click any column header
            • Go to Table Views
            • Choose the view you’d like to use

            Switching Between Views

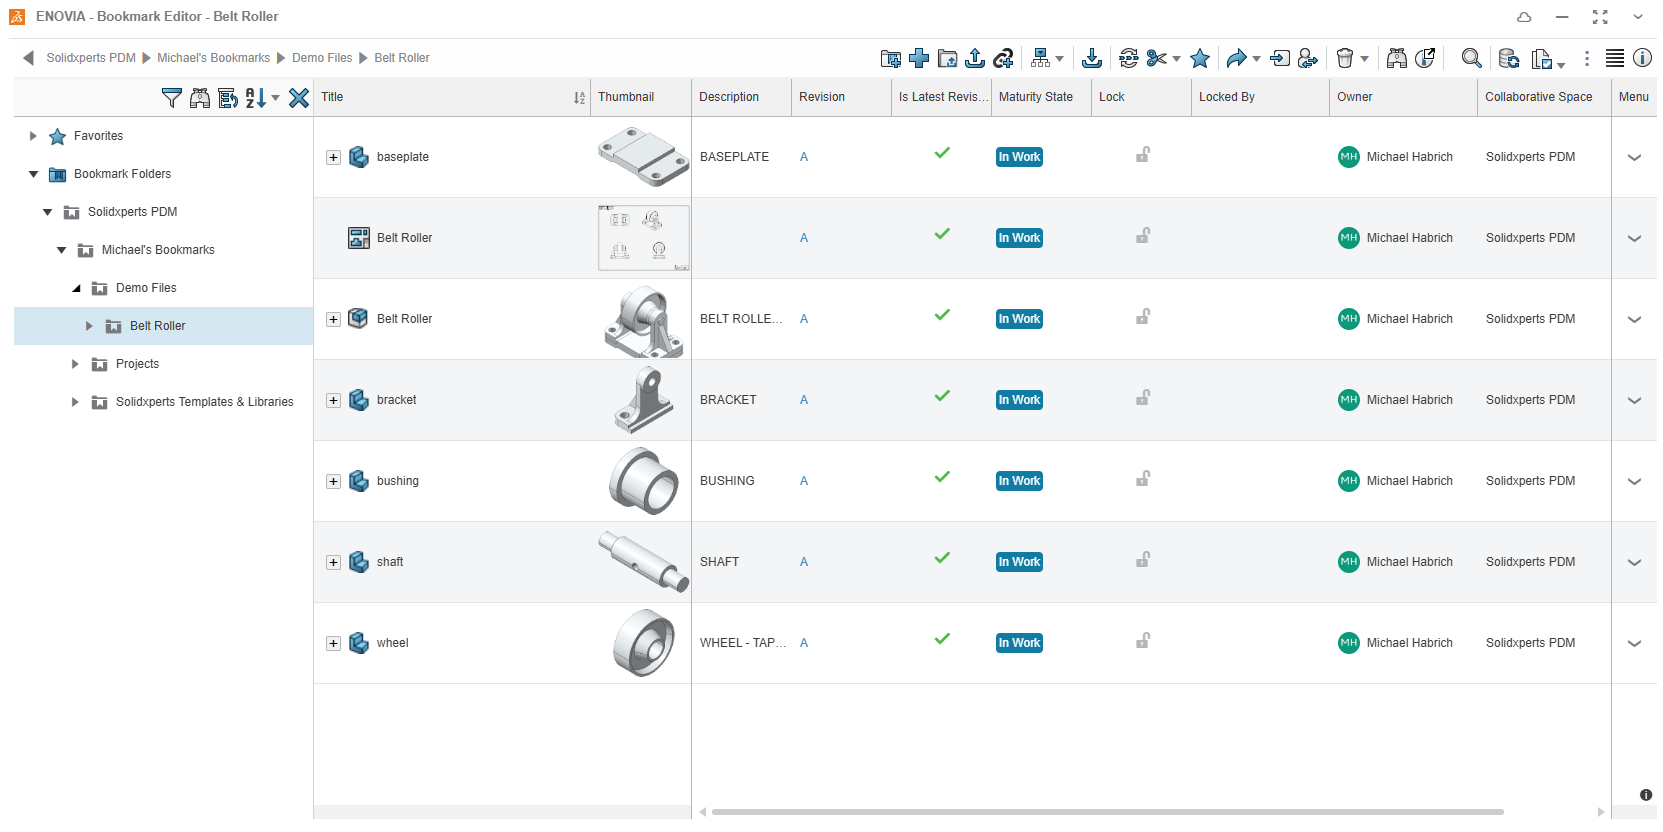
            Done! Your Bookmark Editor now includes visual thumbnails, making it easier to browse, recognize, and manage your data at a glance.

            Your Bookmark Editor now includes visual thumbnails

            Want More 3DEXPERIENCE  Platform Tips?

            We love helping teams get the most out of their tools.
            If you’d like to go a bit further:

            • Explore more tutorials on our YouTube channel;
            • Join a training;
            • Or reach out! We are always happy to share best practices and workflows.

            Your platform should feel like it’s working for you. And we’re here to make sure it does!


            Michael Habrich

            3DEXPERIENCE Specialist

            X_green_halo

            Any questions? Need help? Ask one of our experts.

            Whether you’re ready to get started or just have a few more questions, you can contact us toll-free:

              Creating Custom Attributes in 3DEXPERIENCE

              BLOG

              Creating Custom Attributes in 3DEXPERIENCE

              Sometimes the standard attributes in 3DEXPERIENCE just aren’t enough. Maybe you need a custom field to track a project code, client name, or any other detail that’s specific to your workflow. The good news? You can create your own attributes in just a few steps — and we’ll show you how.

              Before You Start

              To build custom attributes, you’ll need:

              • Administrative privileges on your platform

              • The Platform Manager role assigned to your profile

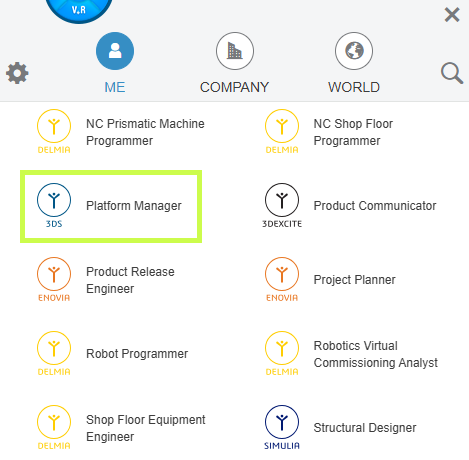
              Platform Manager

              Once that’s in place, you’re ready to go.

              Step 1: Open Attributes Management

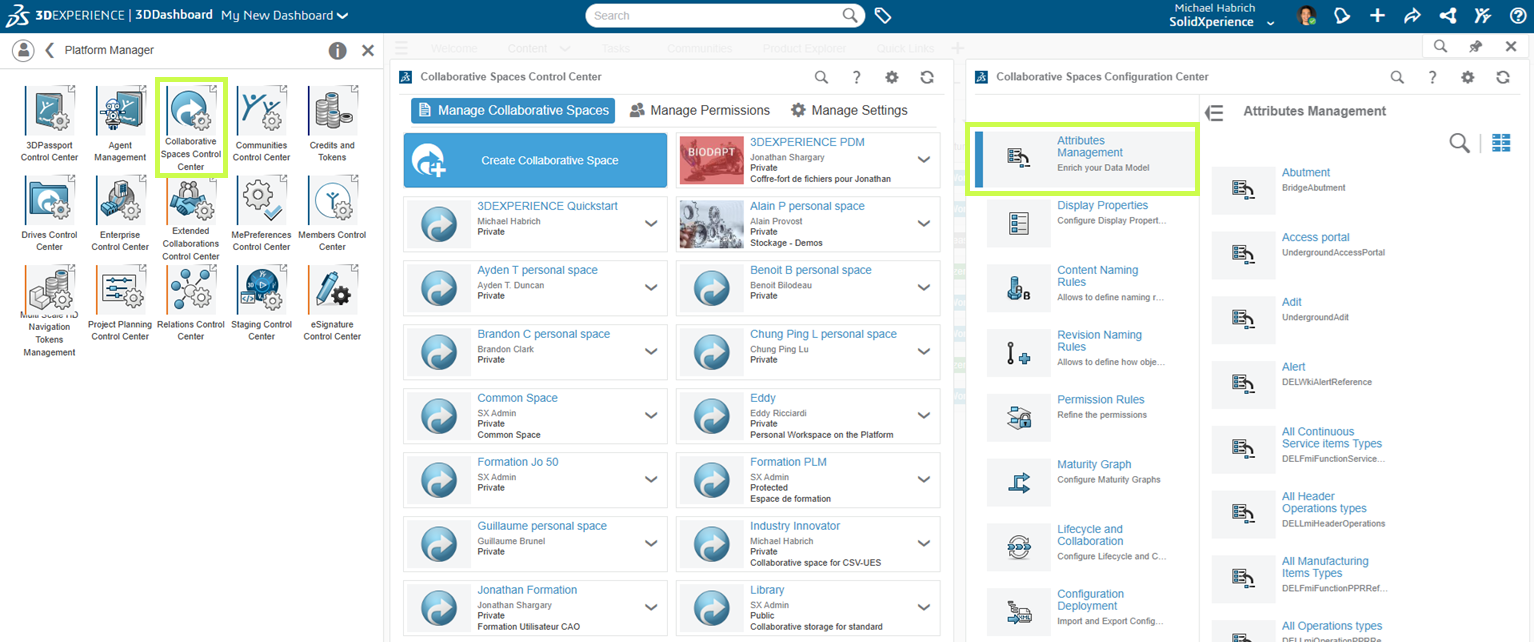
              1. Select the Platform Management role.

              2. Head into the Collaborative Spaces Control Center.

              3. From there, choose Attributes Management.

              Create a Collaborative Space

              C’est ici que toute la personnalisation prend forme.

              This is where all the customization magic happens.

              Step 2: Find Physical Product

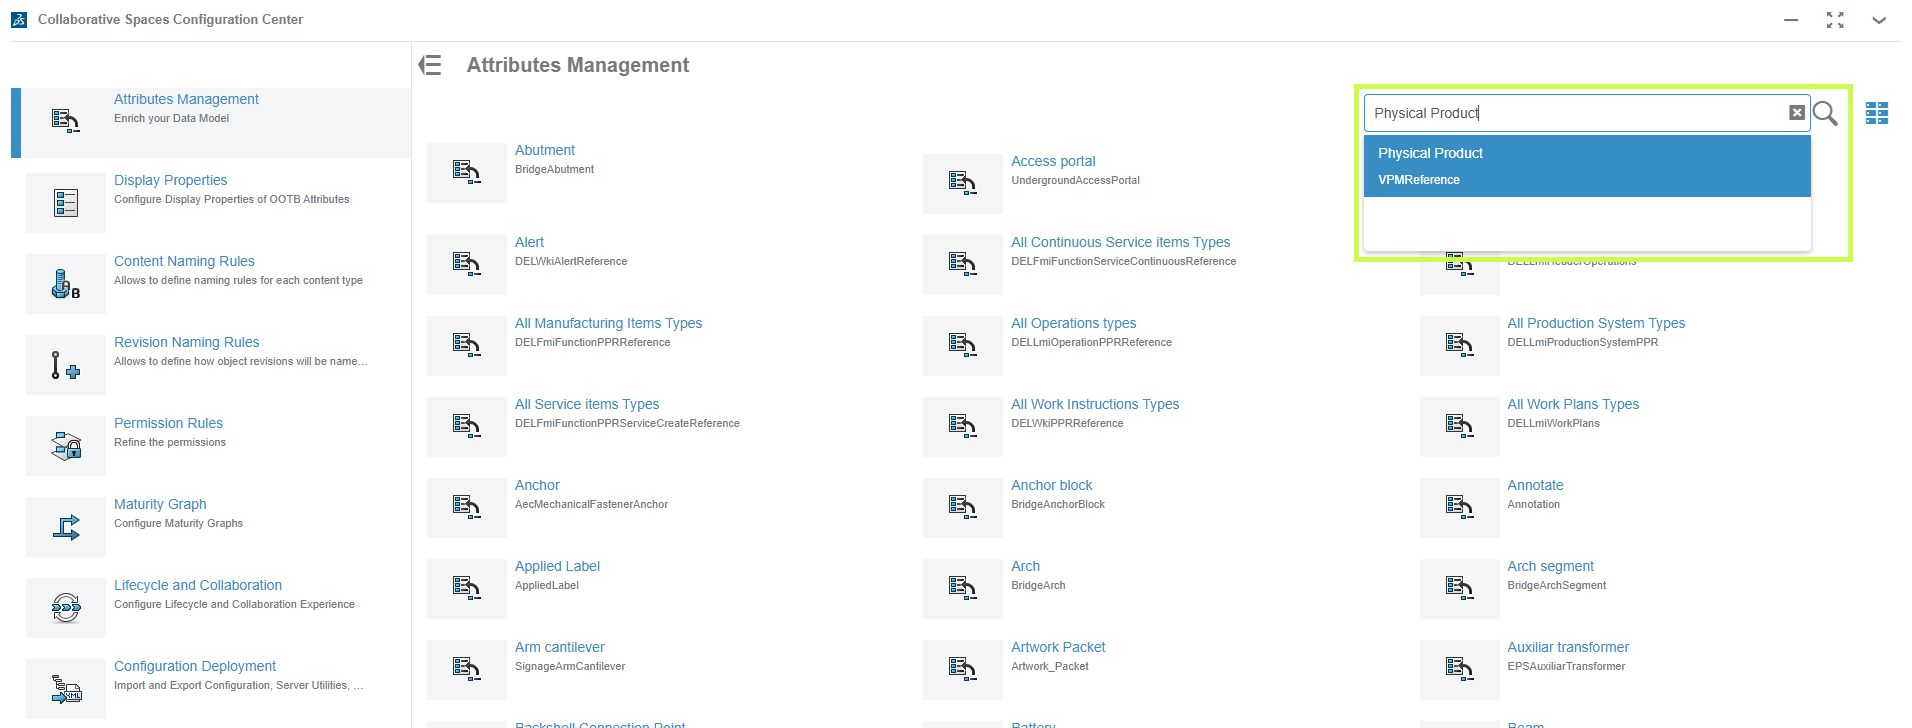
              In the search bar (click the little magnifying glass), type Physical Product.
              This is the object type where most custom attributes live, alongside built-ins like Material or Weight.

              Attribute - Physical Product

              Step 3: Create Your Attribute

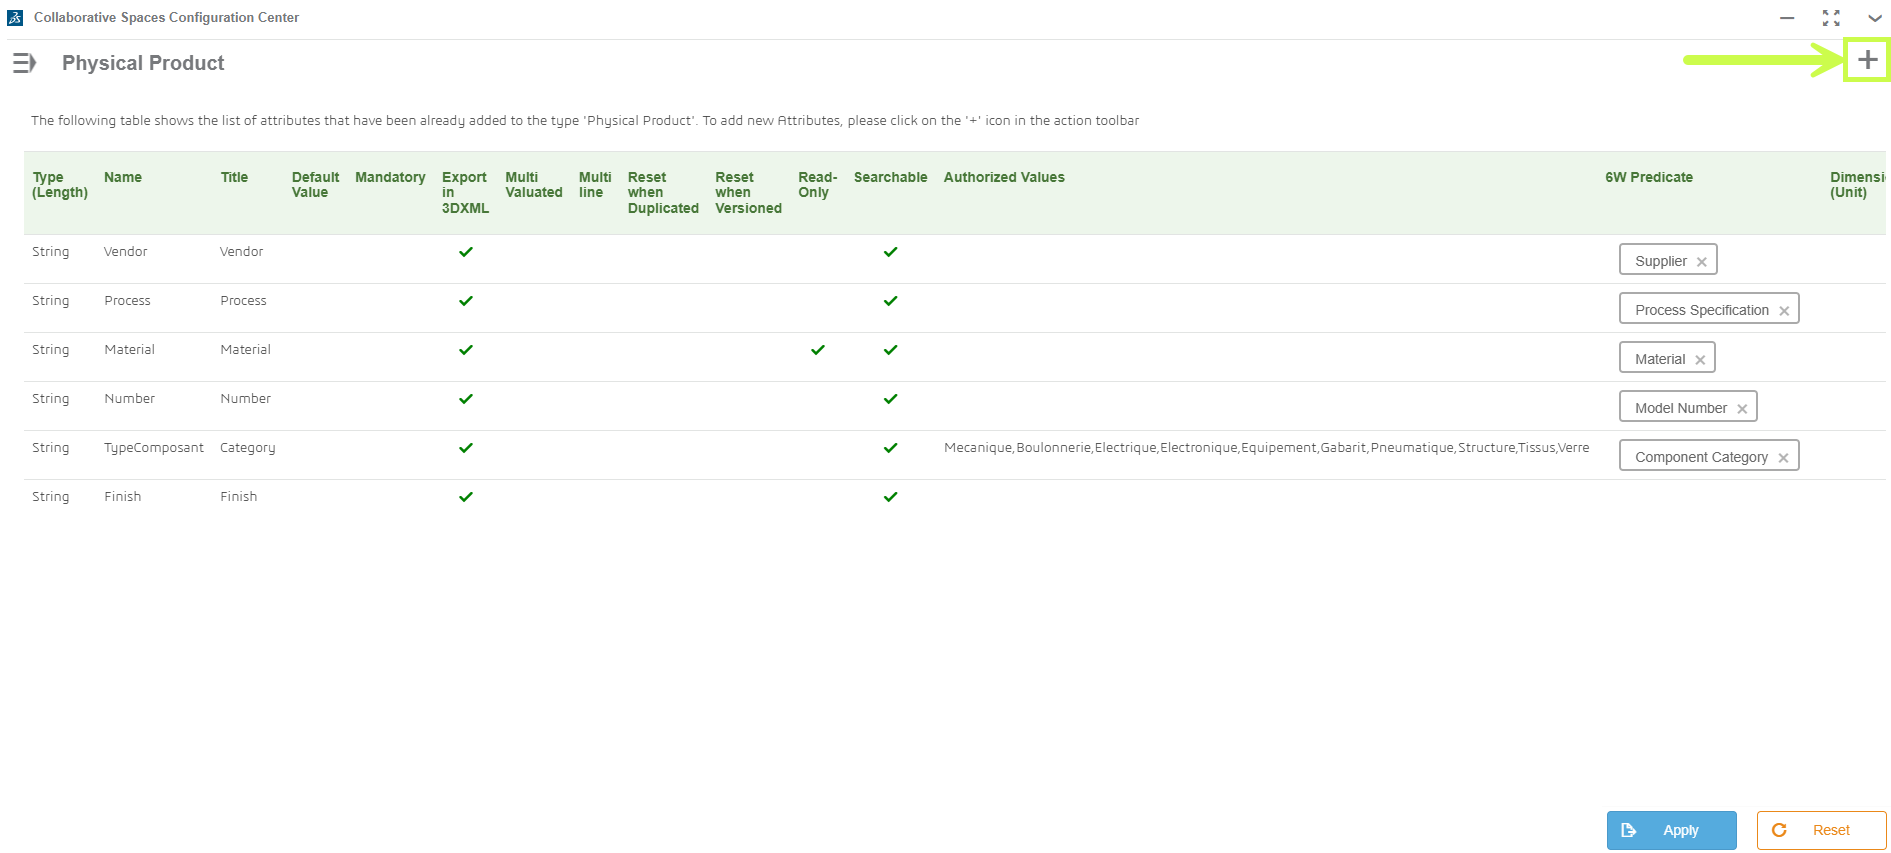
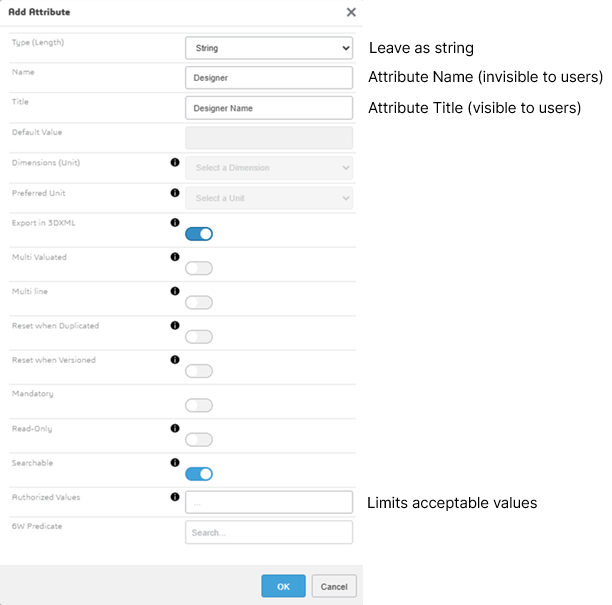
              1. Click the plus sign in the top-right corner.

              Create your attribute in the 3DEXPERIENCE platform

              1. Choose a unique name (no duplicates, no special characters).

              Choose a unique name

              1. Hit OK — and your new attribute will appear at the bottom of the Physical Product page.

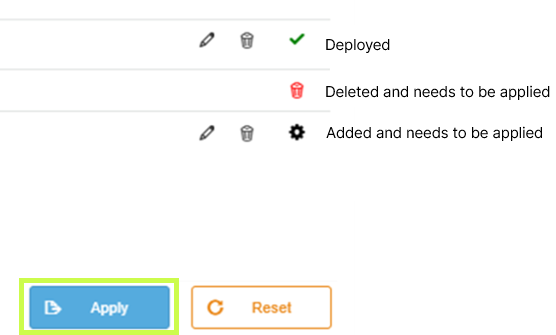
              Apply

              👉 Pro tip: if you don’t see the green check mark, it means the attribute hasn’t been activated yet.

              Step 4: Activate and Deploy

              To make your new attribute usable:

              1. Click Apply.

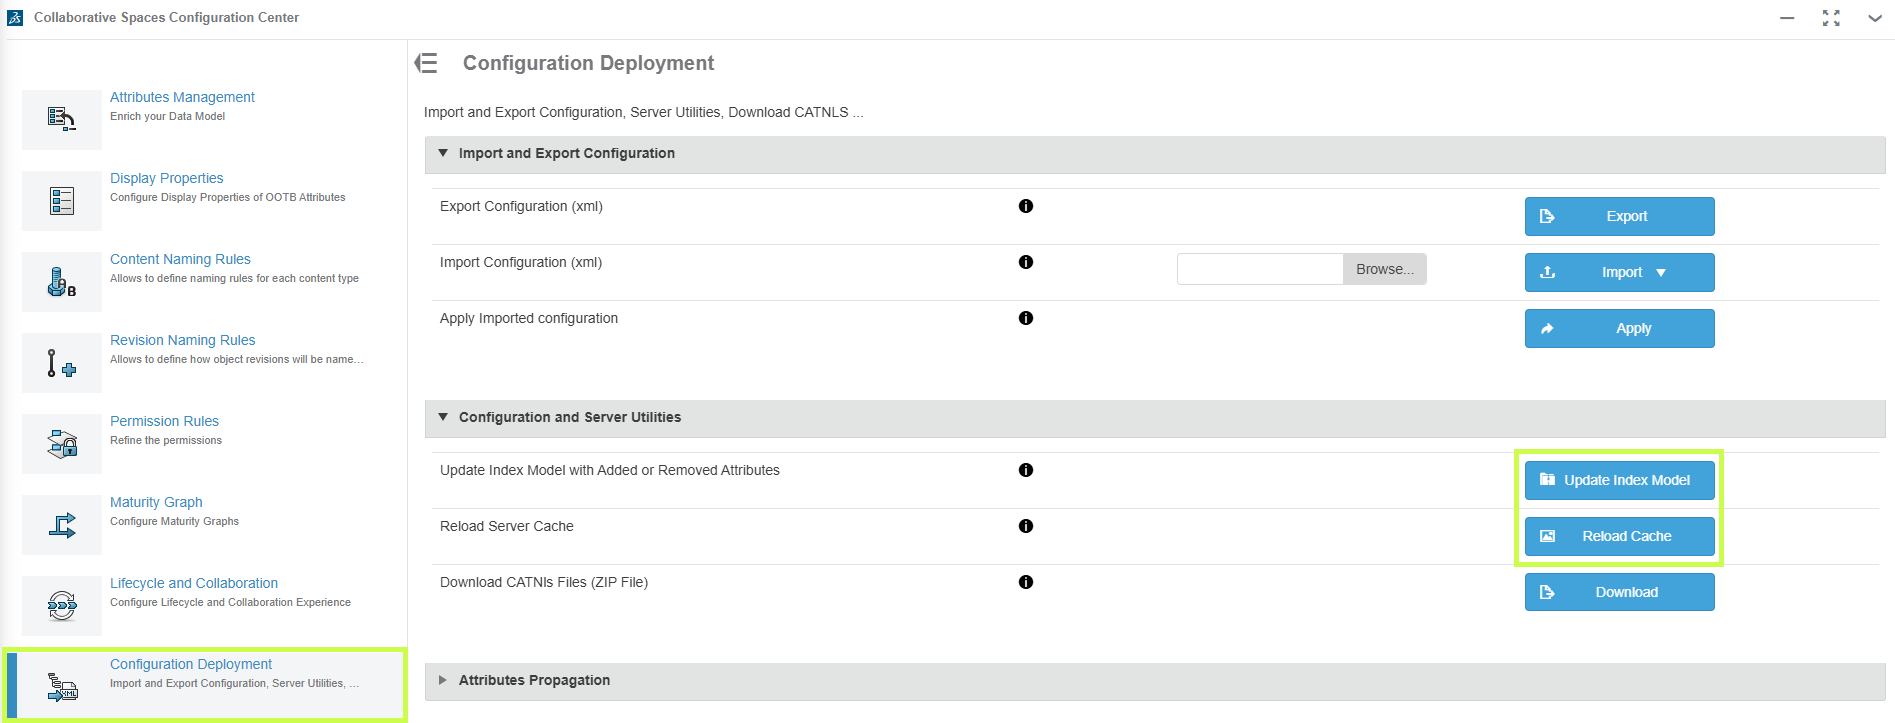
              2. Go to the Collaborative Spaces Configuration Center.

              3. Run Update Index Model and Reload Cache.

              Active and Deploy in the 3DEXPERIENCE platform

              ⚠️ Heads-up: this part may take a few minutes. Be patient while the platform updates.

              Step 5: Test It Out

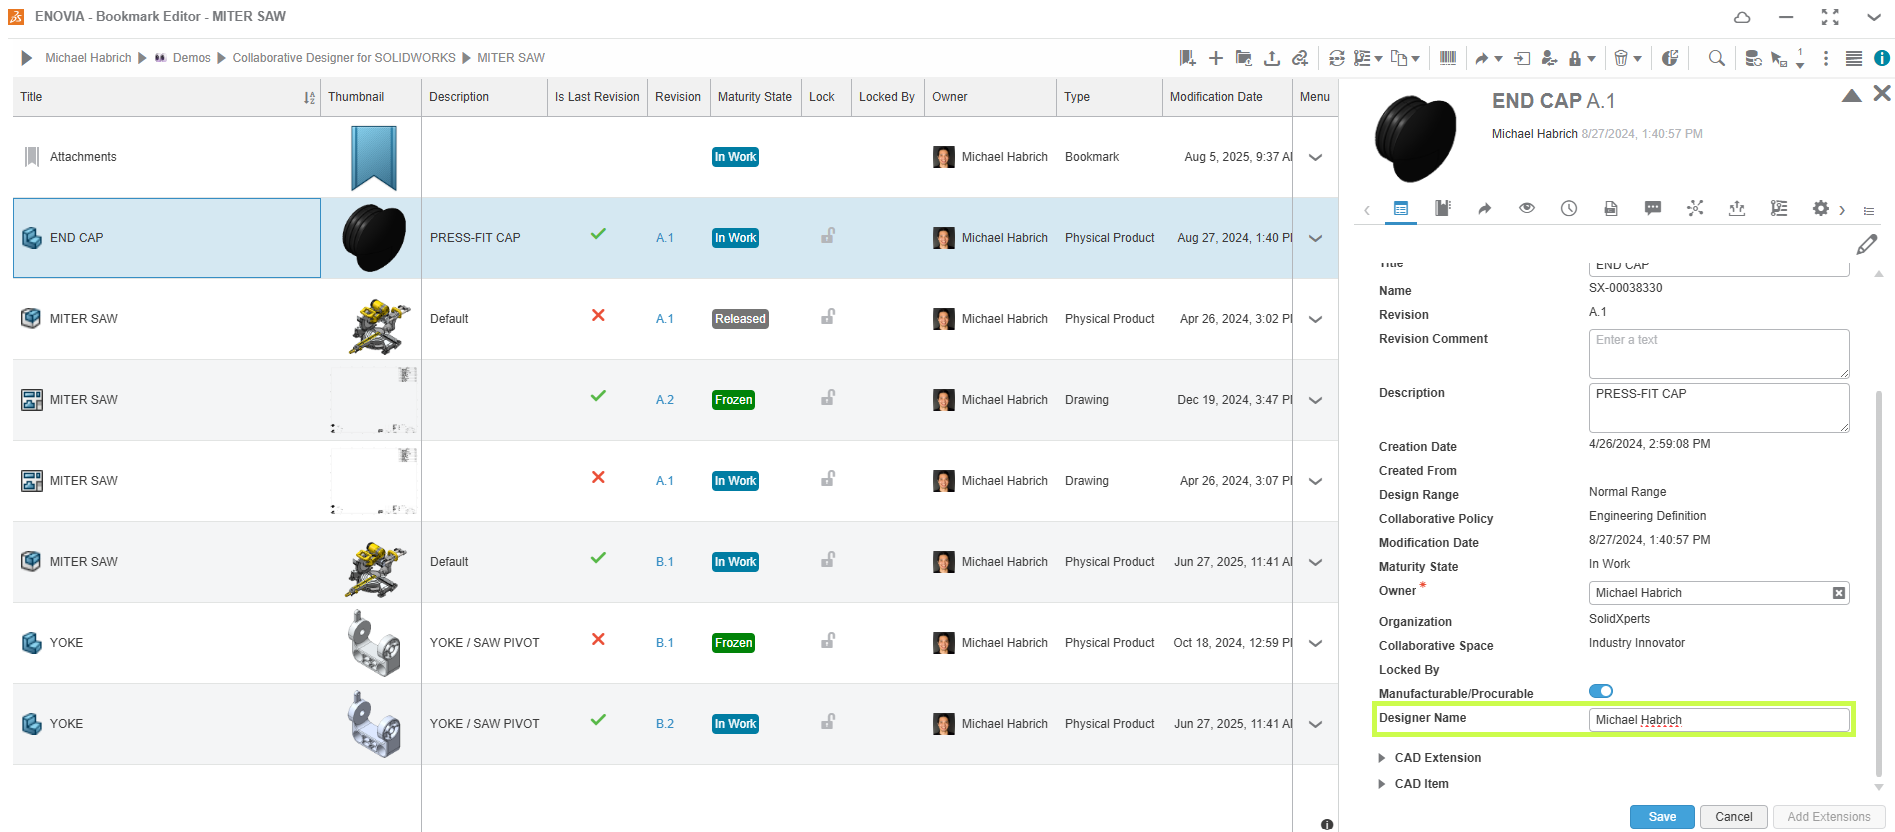
              Open any saved 3D part, click the down arrow > Information, and scroll down. Your new custom attribute should now be visible and ready to use. Add a value to confirm everything’s working as expected.

              Test it out in the 3DEXPERIENCE Platform

              Why Custom Attributes Matter

              By creating custom attributes, you’re tailoring 3DEXPERIENCE to fit your business. That means:

              • Better search results

              • Smarter organization

              • Easier categorization of your data

              At Solidxperts, we’re all about helping you get the most out of your tools. Custom attributes are just one way to make your 3DEXPERIENCE platform work harder for you.

              Need a hand setting them up? Our team can walk you through it and make sure your environment is optimized for your exact workflow.


              Michael Habrich

              3DEXPERIENCE Specialist

              X_green_halo

              Any questions? Need help? Ask one of our experts.

              Whether you’re ready to get started or just have a few more questions, you can contact us toll-free:

                Managing Your 3DEXPERIENCE Cache: Keep Your Files Clean and Up to Date

                BLOG

                Managing Your 3DEXPERIENCE Cache: Keep Your Files Clean and Up to Date

                One of the biggest advantages of the 3DEXPERIENCE platform is having your files stored securely in the cloud. You can access your designs anytime, anywhere, and collaborate with teammates without worrying about version control.

                Behind the scenes, SOLIDWORKS uses a local cache, a folder on your computer where files are temporarily stored while you work. These cached files are then synced with the 3DEXPERIENCE servers when you save or refresh.

                Managing this cache is key to keeping your designs current, preventing confusion, and saving disk space. Let’s take a closer look.

                Where to Find the 3DEXPERIENCE Cache

                Think of 6W Tags as smart labels that make it easy to filter, sort, and find your files in 3DSpace or 3DDrive.

                Your cache shows up both in SOLIDWORKS (via the 3DEXPERIENCE add-in) and in Windows Explorer. While you can browse the cache folders directly, we don’t recommend managing them that way. Instead, stick to the tools built into SOLIDWORKS.

                Here are the default folder locations:

                • SOLIDWORKS Desktop with the 3DEXPERIENCE add-in:
                  C:\3DEXPERIENCE

                • SOLIDWORKS Connected:
                  C:\Users\<username>\AppData\Local\DassaultSystemes\3DEXPERIENCE

                Managing the Cache Inside SOLIDWORKS

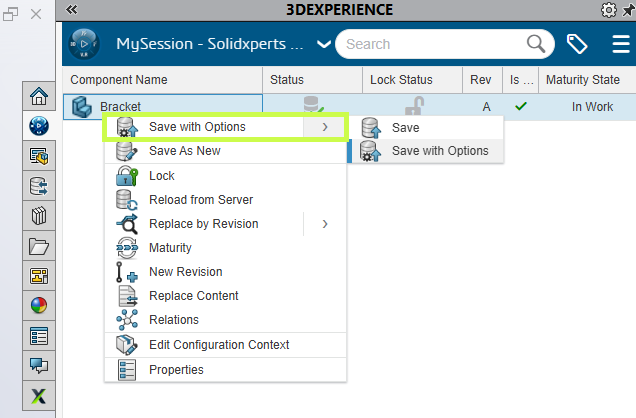
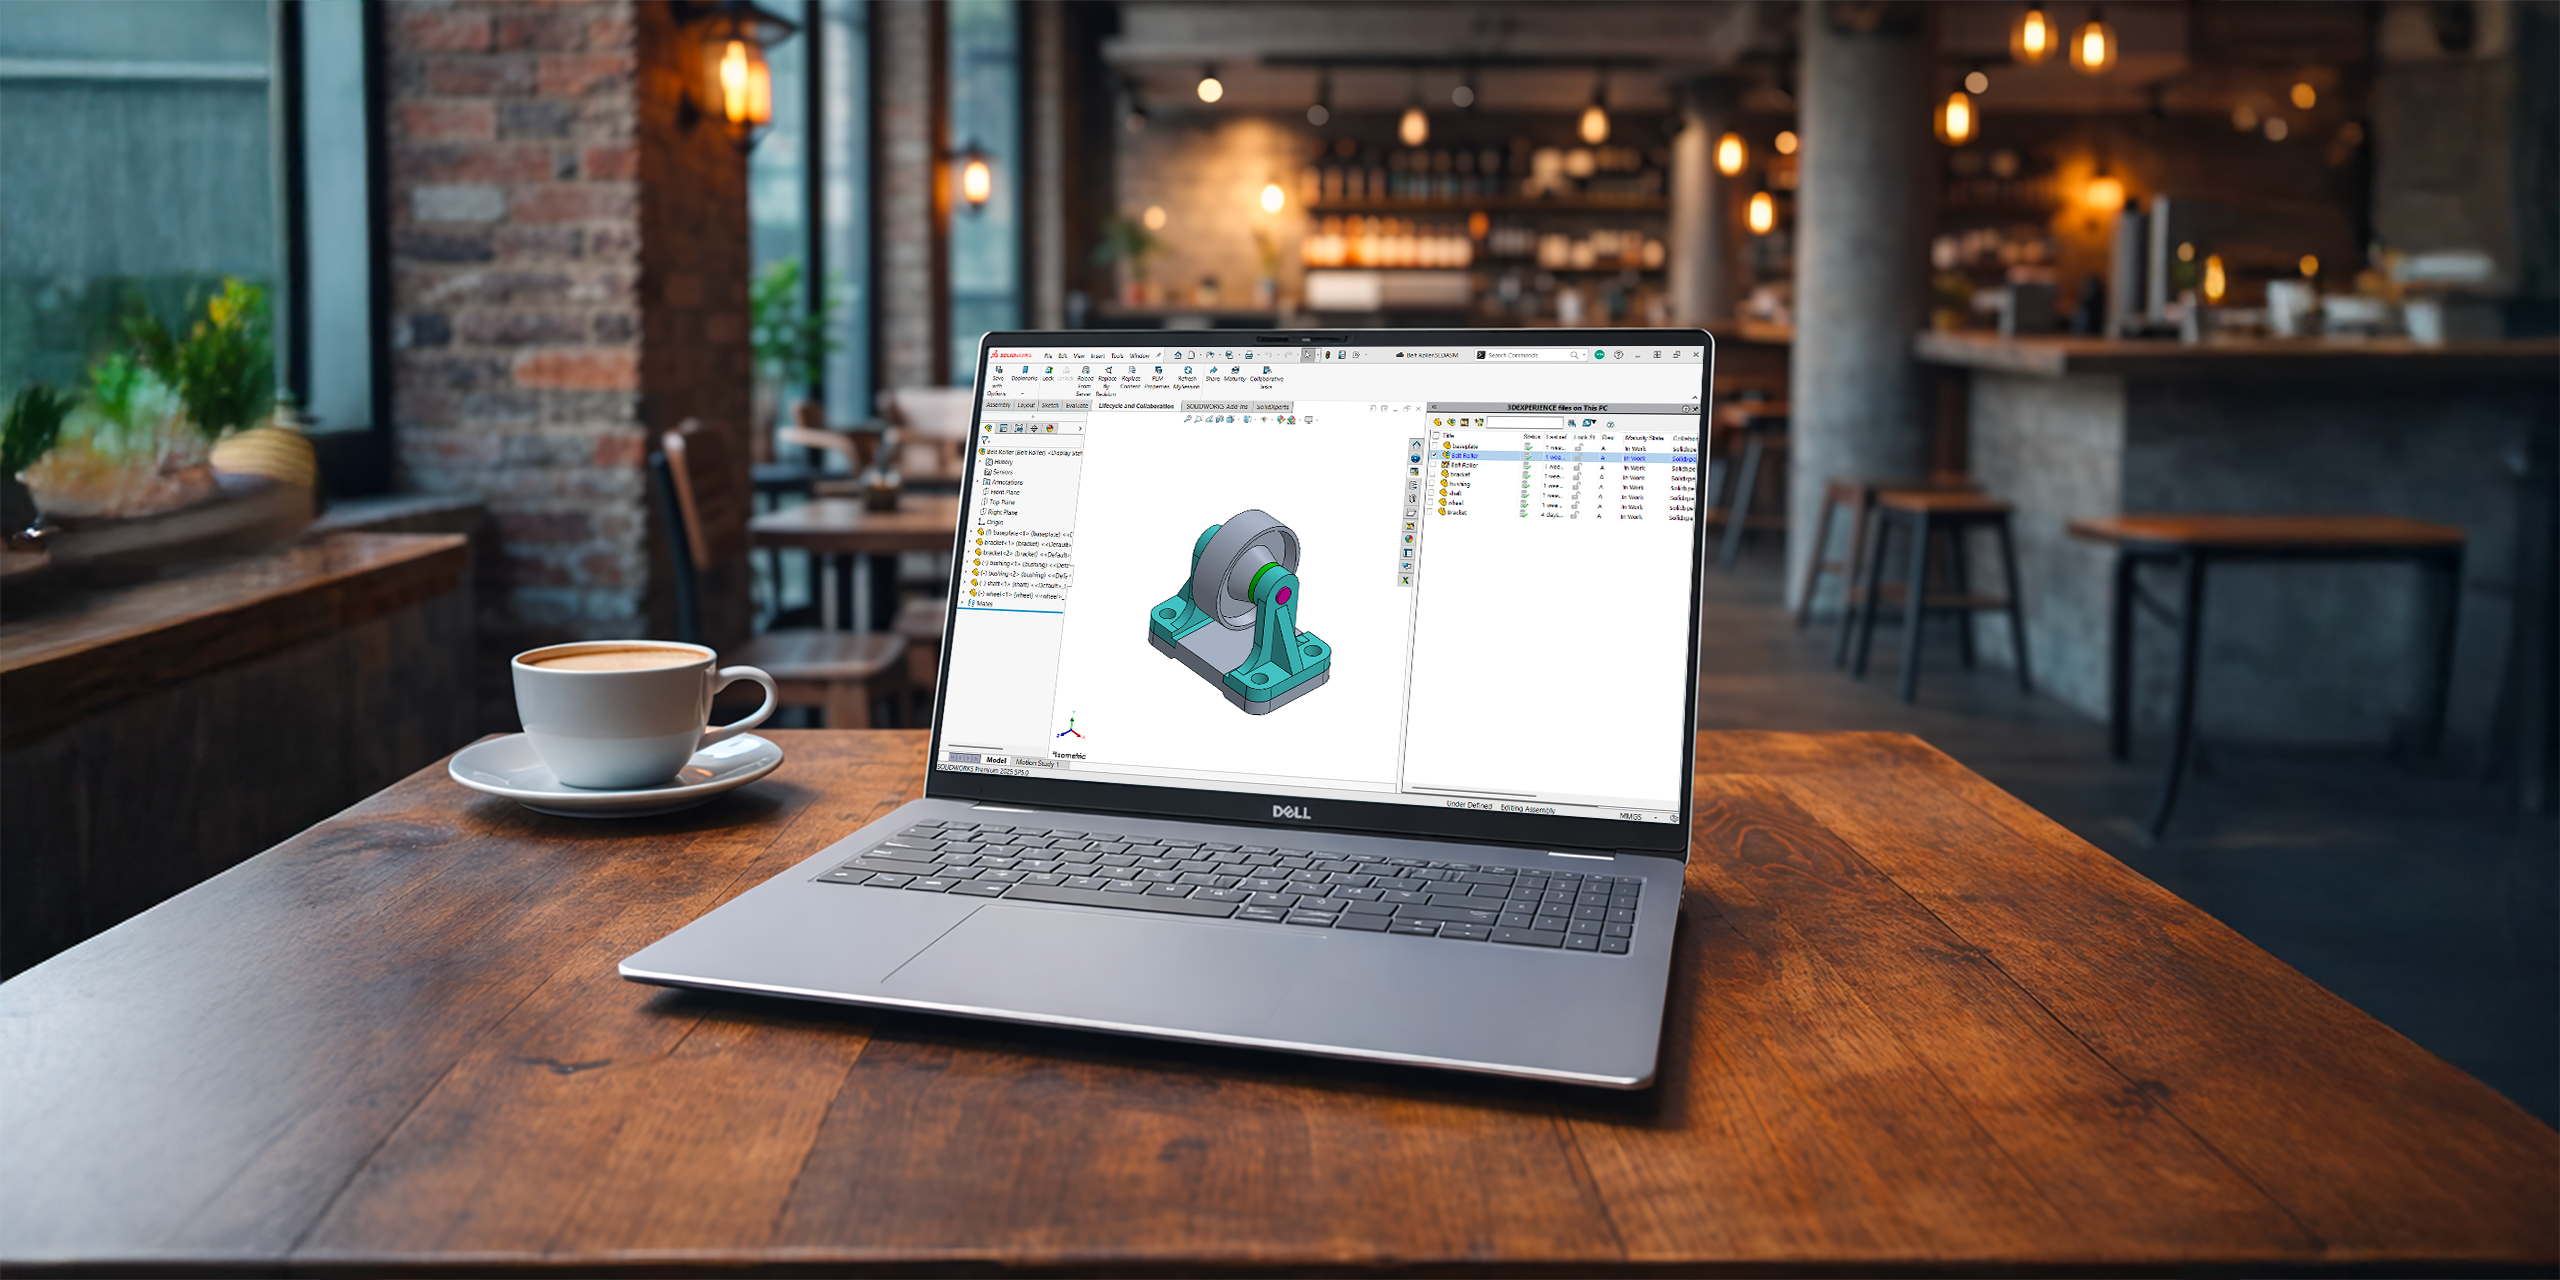
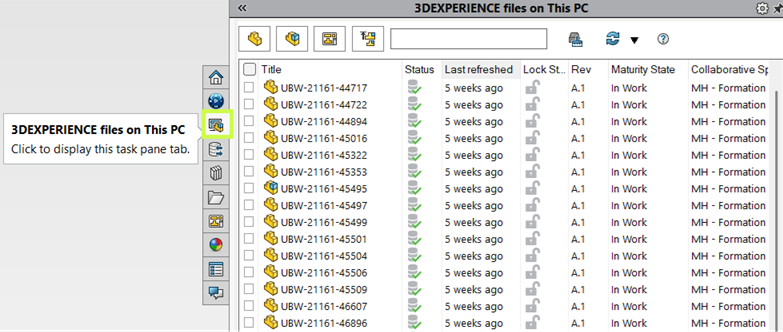
                When you enable the “3DEXPERIENCE Files on This PC” add-in, you’ll see a dedicated tab in the Task Pane. This view shows you all cached files with helpful details like:

                • Status

                • Lock Status

                • Maturity State

                ub / Managing Your 3DEXPERIENCE Cache

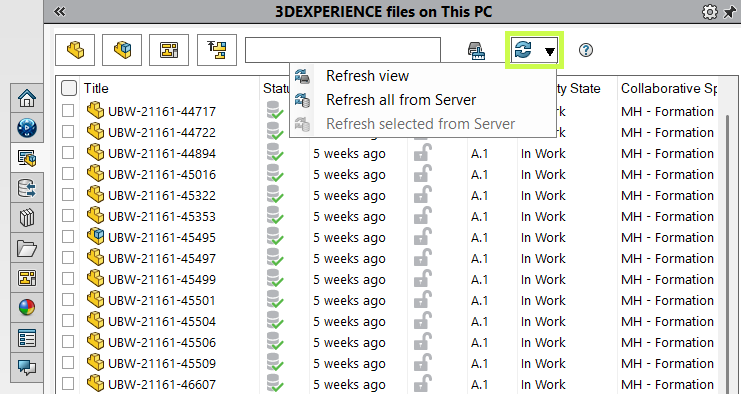
                From here, you can quickly refresh your cache to make sure you’re always working with the latest version.

                • Refresh View updates the local cache for selected files.

                • Refresh from Server checks for changes made by other users and downloads the latest copy if needed.

                • Starting a new SOLIDWORKS session automatically refreshes files in the background.

                ub / Managing Your 3DEXPERIENCE Cache - 2

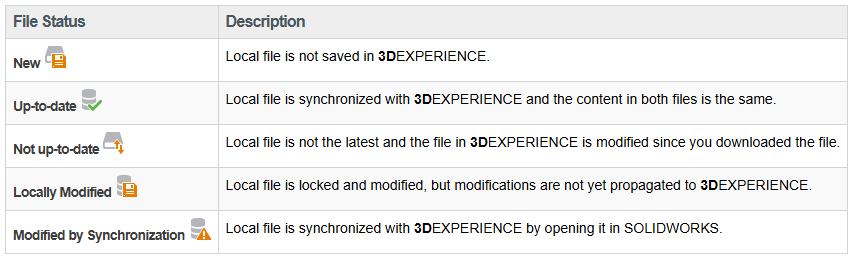
                Understanding Cache Status Icons

                The status icons make it easy to tell if your local files are current, out-of-date, or waiting to be uploaded. They also warn you if refreshing would overwrite changes you’ve made locally.

                ub / Managing Your 3DEXPERIENCE Cache - Icons

                Pro tip: Always double-check before reloading from the server. Unsaved local edits will be lost.

                Cleaning Up the 3DEXPERIENCE Cache

                Over time, cached files can pile up and take up space. To keep things tidy (and ensure you’re pulling the latest versions from the cloud), it’s a good idea to clean your cache periodically.

                Here’s how:

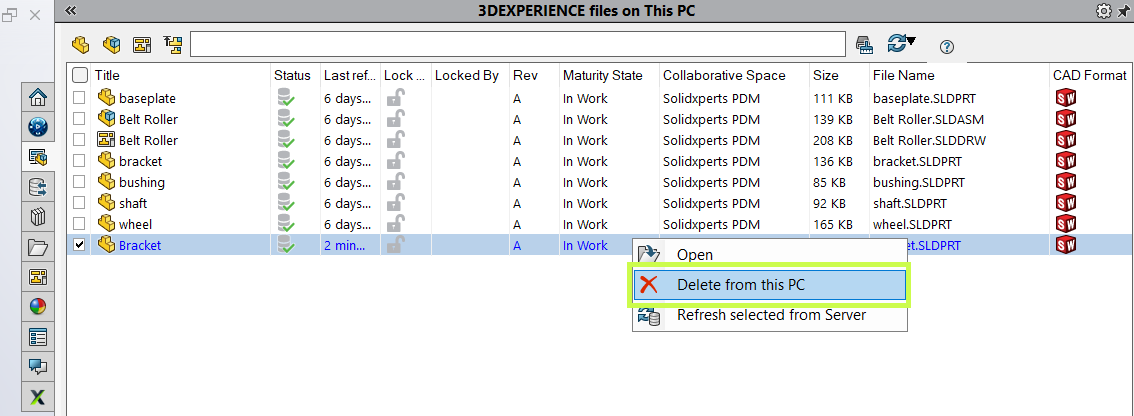
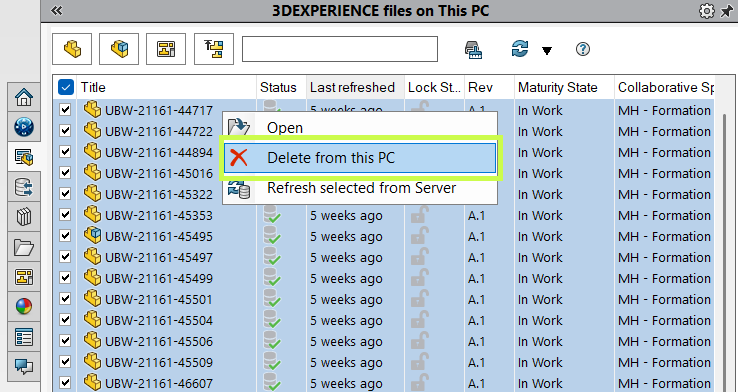
                1. In the Task Pane, select individual files, or use the top-left checkbox to select all.

                2. Right-click and choose Delete from this PC.”

                ub / Managing Your 3DEXPERIENCE Cache - Delete

                This only removes files from your local cache. Your data stays safe in the 3DEXPERIENCE platform.

                You can also use:

                • Filters to find specific file types.

                • The search box to locate files quickly.

                And before you delete, always confirm your files are saved and synced to the platform.

                Automating Cache Clean-Up

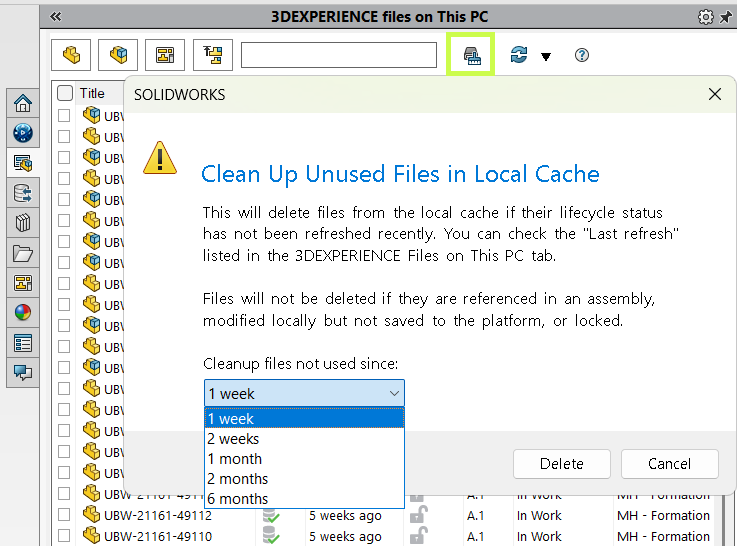
                Don’t want to do it manually? The Clean Up command takes care of it for you.

                • By default, it removes unchanged files older than one week.

                • Locked or modified files won’t be touched.

                • If you open an assembly later, any missing references are automatically redownloaded from the server.

                ub / Managing Your 3DEXPERIENCE Cache - Automation

                If disk space isn’t a concern, you can extend the timeframe to reduce how often files get cleared. It is especially useful if your internet connection is slow.

                A Simple Habit for Staying Up to Date

                The local 3DEXPERIENCE cache is like a bridge between your desktop and the cloud. Keep it clean, refresh it often, and you’ll always know you’re working with the latest designs.

                Want to get even more out of your 3DEXPERIENCE platform? Our training sessions are designed to help you and your team take full advantage of its powerful tools.


                Michael Habrich

                3DEXPERIENCE Specialist

                LinkedIn

                X_green_halo

                Any questions? Need help? Ask one of our experts.

                Whether you’re ready to get started or just have a few more questions, you can contact us toll-free:

                  Make Your Data Work for You with 6W Tags on the 3DEXPERIENCE Platform

                  BLOG

                  Make Your Data Work for You with 6W Tags on the 3DEXPERIENCE Platform

                  The 3DEXPERIENCE platform isn’t just about CAD in the cloud. It’s your all-in-one workspace where design, data management, and collaboration come together. Whether you’re sketching with xShape, modeling in xDesign, or connecting to SOLIDWORKS, the platform helps keep everything, and everyone, in sync.
                  But let’s be honest: every engineering project generates mountains of data. 3D models, drawings, BOMs, simulations, even invoices and Word docs. It all piles up. The good news? The platform makes it easy to organize and navigate this information with a powerful tool called 6W Tags.

                  What Are 6W Tags?

                  Think of 6W Tags as smart labels that make it easy to filter, sort, and find your files in 3DSpace or 3DDrive.

                  6W Tags in SOLIDWORKS

                  And it’s not just CAD data. Office documents, simulation results, and more can all benefit from tagging.

                  Here’s how the 6Ws break down:

                  • What: Type of content (CAD models, documents, simulations, tasks, etc.)
                  • Who: The person who uploaded, edited, revised, or owns the data
                  • When: Date or time range
                  • Where: Geolocation or data source
                  • How: Manufacturing method (made in-house or purchased)
                  • Why: Links to project or task management

                  Out of the box, the system automatically fills in basics like owner, location, and save date. But the real power comes when your team adds custom tags. For example, you can include project numbers, material types, or vendor names so searches are tailored to your company’s workflow.

                  How to Use 6W Tags

                  Let’s say you search for “bolt” in 3DEXPERIENCE. Without filters, you might get hundreds (if not thousands) of results. That’s where 6W Tags shine.

                  Search bar for 6W Tags in SOLIDWORKS

                  Click the tag icon next to the search bar, then start narrowing your results. For example:

                  • Under What, choose Physical Product (to exclude tasks or documents).
                  • Add a Material filter for Stainless Steel.

                  By stacking filters, your results go from overwhelming to precise in just a few clicks.

                  Real-World Examples

                  In one test, a simple search brought back over 1,000 results. But after filtering with 6W Tags for “Physical Product” and “Plain Carbon Steel,” the number of results dropped down to two digits. That’s the power of smart filtering.

                  Beyond search, 6W Tags can be used visually inside apps. For example, parts can be color-coded by material in the graphics area, giving you an instant overview of your design.

                  From Data Overload to Data Control

                  Data shouldn’t slow you down and with 6W Tags, it won’t. Whether you’re hunting down a single file or organizing entire projects, the 3DEXPERIENCE platform helps you stay in control.

                  Want to learn more tips like this? Our experts at Solidxperts can help you get the most out of your 3DEXPERIENCE environment. Reach out anytime or join one of our training sessions!


                  Michael Habrich

                  3DEXPERIENCE Specialist

                  LinkedIn

                  X_green_halo

                  Any questions? Need help? Ask one of our experts.

                  Whether you’re ready to get started or just have a few more questions, you can contact us toll-free:

                    Organizing and Managing Your SOLIDWORKS Libraries in 3DEXPERIENCE

                    BLOG

                    Organizing and Managing Your SOLIDWORKS Libraries in 3DEXPERIENCE

                    One of the biggest strengths of the 3DEXPERIENCE platform is how it brings your team together. With SOLIDWORKS Cloud Services, you get built-in data management, making it simple to collaborate with colleagues, keep projects organized, and even access your designs on the go.

                    Whether you’re working in SOLIDWORKS Connected or traditional SOLIDWORKS combined with Collaborative Designer for SOLIDWORKS, you have a direct link to the 3DEXPERIENCE platform, so opening, saving, and managing your model data feels seamless.

                    But here’s the thing: design work goes beyond just parts and assemblies. You also rely on libraries, weldment profiles, sheet metal gauge tables, templates, routing components, and more. Keeping those libraries in sync across your team is just as important as managing your models. And with 3DEXPERIENCE, you can centralize those libraries too.

                    Step 1: Create Your Library Structure

                    Start in the Bookmark Editor app (in your web browser). Create a clean folder structure for your templates and libraries, with subfolders for each type. Then, simply drag and drop your files into place.

                    This way, your team has one organized hub for all shared resources.

                    Step 2: Set Up Weldment Profiles

                    For weldments, it’s best to stick with a consistent naming convention: Standard → Type → Size.

                    We also recommend customizing your standard names to keep them separate from the defaults SOLIDWORKS provides. For example, you might create a standard called “Xperts – ANSI Inch”.

                    Once you’ve named things properly, drag your weldment profile files (or entire folders) from Windows File Explorer directly into your 3DEXPERIENCE bookmark. Quick, easy, and ready to use.

                    Step 3: Connect Libraries to SOLIDWORKS

                    Inside SOLIDWORKS, go to System Options → File Locations. When you add a new location, choose “Select from 3DEXPERIENCE”.

                    This links SOLIDWORKS to your bookmarks, syncing the content down to your local cache (usually found at C:\Users\Public\Documents\SOLIDWORKS). You’ll notice the linked locations show up in brackets, confirming they’re tied to the platform.

                    To make sure you’re always up to date, just click Update. SOLIDWORKS will pull the latest versions from 3DEXPERIENCE, keeping your whole team in sync.

                    Step 4: Keep Your Libraries Updated

                    Need to update a file? Head back into the Bookmark Editor in your browser, right-click the file, and select Update. Browse for the new version locally, and the platform will take care of the rest.

                    Once it’s updated in 3DEXPERIENCE, users just need to hit Update in their SOLIDWORKS options to refresh their local cache. Simple, controlled, and consistent.

                    Why This Matters

                    Storing your libraries and templates alongside your design data gives you the same benefits: revision control, lifecycle management, and a single source of truth for your team.

                    We focused on weldment profiles here, but the same approach works for routing components, sheet metal gauge tables, and more. With SOLIDWORKS Cloud Services + 3DEXPERIENCE, you’re not just managing files. You’re creating a smarter, more connected workflow for your entire team.

                    At Solidxperts, we love helping teams get the most out of their tools. Setting up your libraries in 3DEXPERIENCE is a small step that makes a big impact on collaboration, efficiency, and design quality.


                    Michael Habrich

                    3DEXPERIENCE Specialist

                    LinkedIn

                    X_green_halo

                    Any questions? Need help? Ask one of our experts.

                    Whether you’re ready to get started or just have a few more questions, you can contact us toll-free:

                        Download

                          Download

                            Download

                            All search results